Recover a Miniscript wallet with Bitcoin Core

Nunchuk is built on open standards and interoperable formats, meaning your wallets can always be recovered using other open-source Bitcoin tools, including Bitcoin Core. This guide explains how to recover and spend from a Miniscript wallet safely with Bitcoin Core, using its descriptor and PSBT features.
Bitcoin Core v24 added basic Miniscript support, allowing recovery of advanced Nunchuk policies such as multisig and timelocked scripts. Version v29+ improves Miniscript handling and descriptor wallets, so using version v29 and above is recommended.
Overview: Two Recovery Approaches
Depending on how you choose to sign your transaction, there are two recovery paths:
- Hardware-based recovery (recommended): Use your hardware signers to restore and sign securely. Private keys never leave your devices.
- Seed-based recovery (software-only): Use your seed phrases or key backups directly in Bitcoin Core. This requires obtaining the
xprvkeys and replacing thexpubs in your wallet descriptor. Only do this on an offline and air-gapped machine for safety.
What You’ll Need
- Seed phrase(s) or hardware signer(s) for your wallet. Ensure that the hardware signers support Miniscript.
- Your Nunchuk wallet configuration file (in BSMS or descriptor format).
- Bitcoin Core v24+ (Miniscript supported; v29+ recommended).
- (Hardware recovery only) HWI (Hardware Wallet Interface): Required to allow Bitcoin Core to communicate with hardware signers. See HWI Installation Guide.
- (Seed recovery only) A BIP-39 to master key converter (like Ian Coleman’s BIP39 tool), used offline.
Wallet Requirements Summary
| Wallet Type | What You Need |
|---|---|
| Single-sig | One seed or signer |
| Multisig | Enough seeds/signers to meet the threshold (e.g., 2-of-3 multisig → any two) |
| Miniscript | Seeds or signers that satisfy the Miniscript policy |
Step 1: Install and Sync Bitcoin Core
Install Bitcoin Core and ensure your node is fully synced with the blockchain before continuing.
$ bitcoind -daemon
Check the synchronization status:
$ bitcoin-cli getblockchaininfo
Wait for "initialblockdownload": false before moving on.
Step 2: (Seed-based only) Obtain Private Keys
If you are using hardware signers (recommended), skip to Step 3.
If you are performing a software-only recovery, you must obtain the private keys (xprvs) associated with your wallet. This is necessary because Bitcoin Core's descriptor wallets do not directly support BIP-39 seed phrases; they require the extended keys (xpub or xprv).
Security Warning: The processes described in step 2 expose your private keys. It is strongly recommended to perform them on an offline and air-gapped computer. Never enter seed phrases or private keys into an online tool.
This process requires an offline derivation tool, such as Ian Coleman's BIP39 tool. Ensure you download and use the offline version.
A. Identify the Derivation Path
First, examine your wallet configuration file to find the derivation path for the key you need to recover. Look for the key origin information within the descriptor.
Example:
[a3b12f34/48h/0h/0h/2h]xpub6DT5...The corresponding derivation path is m/48'/0'/0'/2'.
Note: h or ' both signify hardened derivation; Ian Coleman’s BIP39 tool supports ' only.
B. Obtain Root Key Material
The method depends on your backup type:
Standard BIP39 Seed Phrases
If you have a 12 or 24-word seed phrase, this serves as your root key material.
Tapsigner Backups
Tapsigners do not use BIP39 seed phrases. You must extract the root master private key (xprv) from the backup file.
- Locate the encrypted backup file provided by the Tapsigner.
- Locate the Backup Password, which is printed on the back of the Tapsigner card.
- Decrypt the backup file using the Backup Password.
- The resulting decrypted data will contain the required
xprv...string.
For detailed instructions on decrypting the Tapsigner backup, refer to our Tapsigner's starter guide.
C. Derive the Wallet-Specific Private Key
Now, use the offline derivation tool (e.g., Ian Coleman's BIP39 tool) to calculate the specific child xprv needed for the wallet.
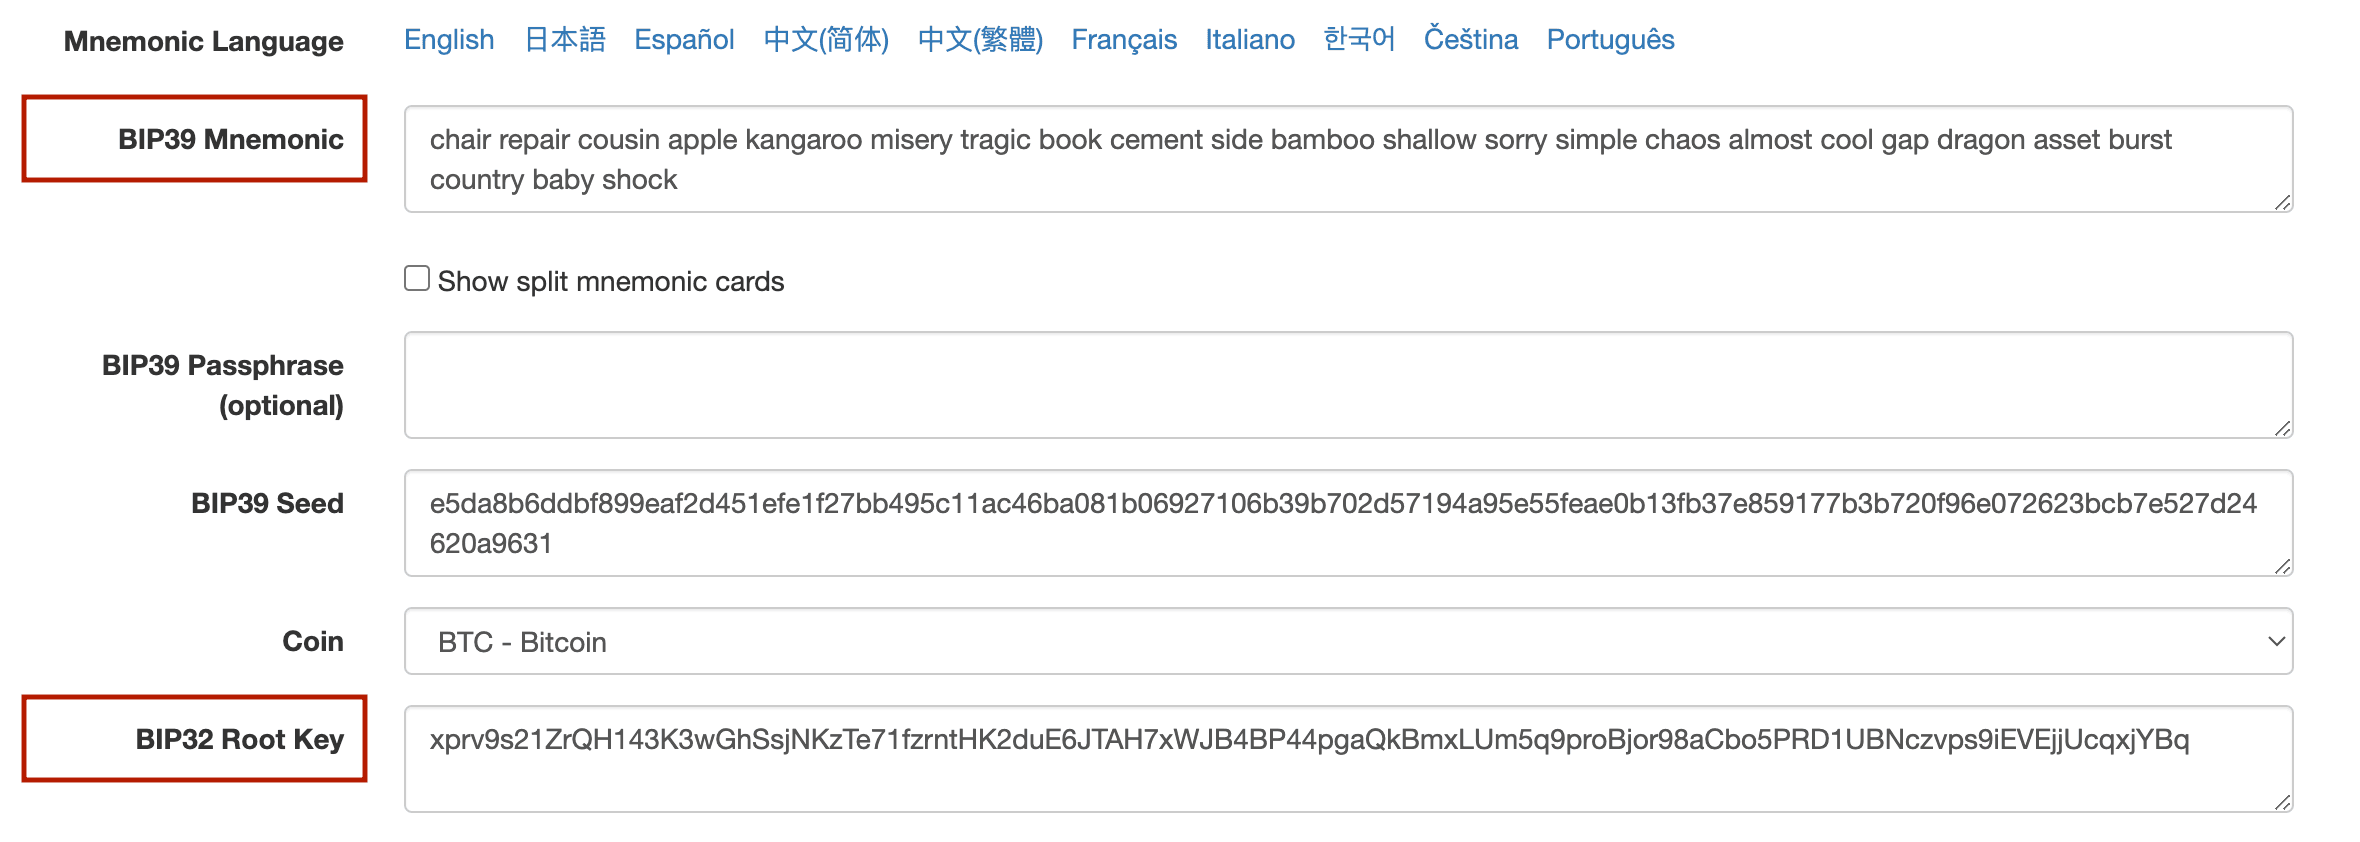
- Open the offline tool.
- Input your root key material:
- If using a Seed Phrase: Enter the 12 or 24-word seed in the "BIP39 Mnemonic" field.
- If using a Tapsigner (Root xprv): Paste the extracted root
xprvinto the "BIP32 Root Key" field. (Ensure the "BIP39 Mnemonic" field is empty or cleared if using this option).
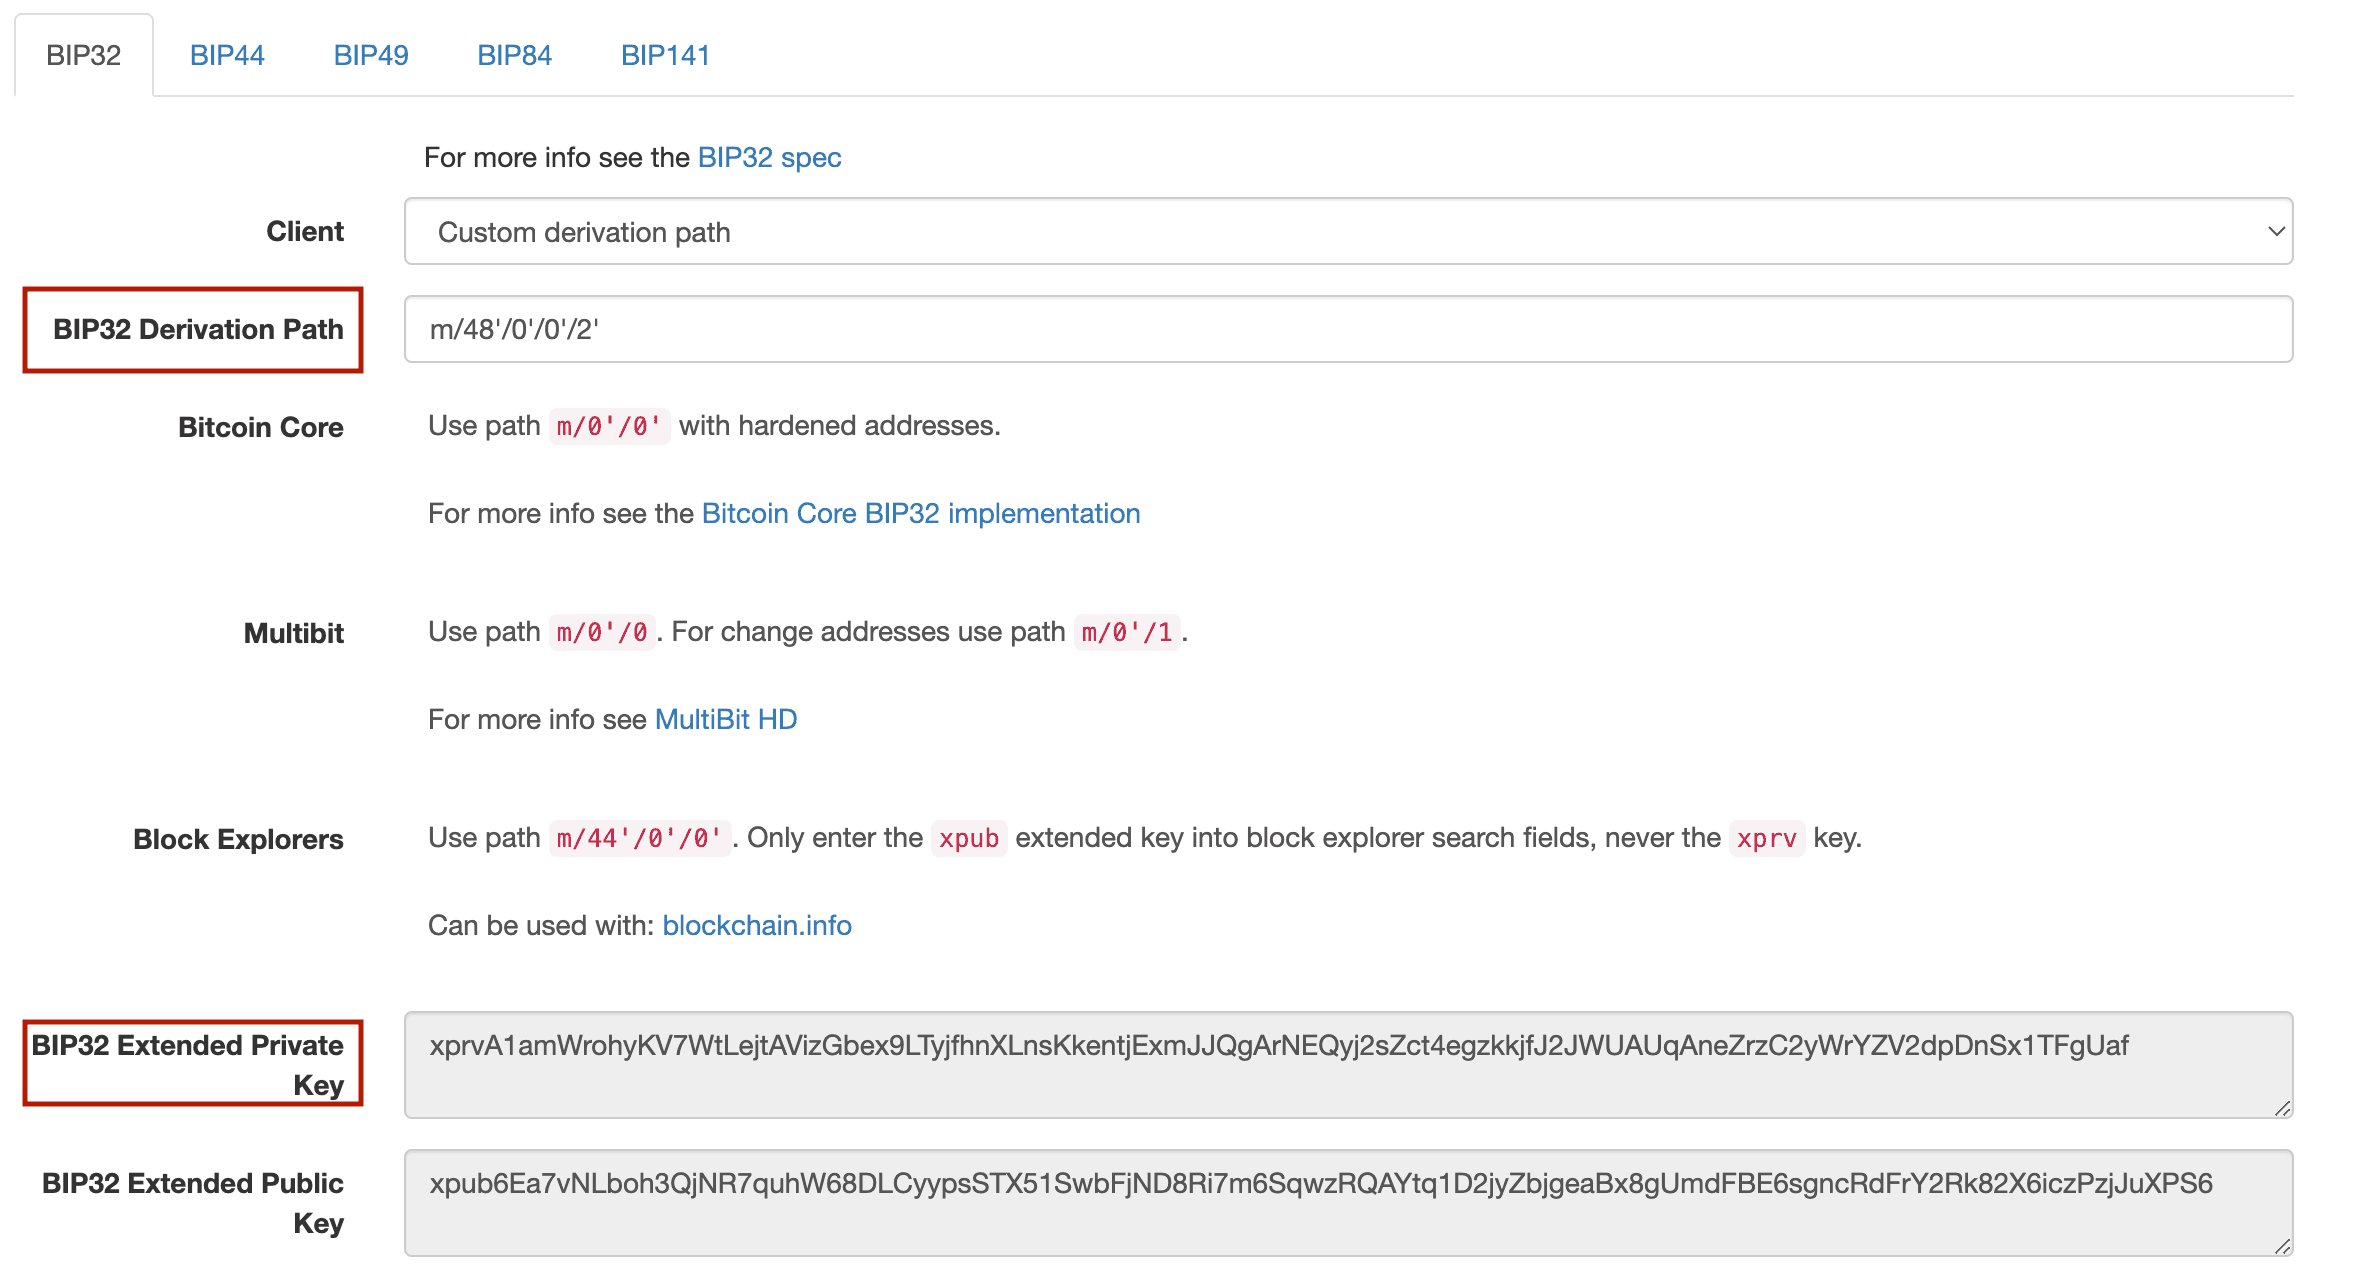
- Navigate to the "Derivation Path" section and select the BIP32 tab.
- Enter the path identified in Step A (e.g.,
m/48'/0'/0'/2') into the "BIP32 Derivation Path" field. - The resulting "BIP32 Extended Private Key" shown below the path is the derived
xprvyou need for Step 3.
Step 3: Review and Prepare Your Wallet Descriptor
Open your Nunchuk wallet configuration file and locate the wallet’s descriptor.
Handling Wallet Configuration Format
- If your configuration file is in BSMS format (Bitcoin Secure Multisig Setup), you will find the wallet descriptor on the second line (or the third line if you use encryption mode).
- If your configuration file is a raw descriptor format, the wallet descriptor is the entire file content.
For Miniscript wallets, Nunchuk uses multi-path descriptors (ending in /<0;1>/*), which Bitcoin Core supports directly. This single descriptor covers both receiving (0) and change (1) addresses.
Example Descriptor:
wsh(and_v(v:pkh([a3b12f34/84h/1h/0h]xpub6DT5.../<0;1>/*),older(1000)))#checksumPreparing for Import
Depending on your recovery approach:
- Hardware-based recovery: Keep the keys as
xpubs. The descriptor can be used as-is. - Seed-based recovery: Replace each
xpubin the wallet descriptor with the correspondingxprvyou obtained in Step 2. Ensure the key origin information (the part in brackets like[a3b12f34/84h/1h/0h]) remains intact.
Important Note on Checksums (Seed-based)
If you modified the descriptor (e.g., by replacing xpub with xprv), the original checksum is invalid. Bitcoin Core requires a valid checksum for import.
Use Bitcoin Core to calculate the new checksum for the modified descriptor:
$ bitcoin-cli getdescriptorinfo "wsh(and_v(v:pkh([a3b12f34/84h/1h/0h]xprvA1amWrohy…/<0;1>/*),older(1000)))"Output:
{
  "descriptor": "wsh...",
  "checksum": "#NEW_CHECKSUM",
  "isrange": true,
  "issolvable": true,
  "hasprivatekeys": true
}
The output will include the new checksum in the "checksum" field. Attach this checksum to the modified descriptor for the import in Step 4.
Modified descriptor with checksum:
"wsh(and_v(v:pkh([a3b12f34/84h/1h/0h]xprvA1amWrohy…/<0;1>/*),older(1000)))#NEW_CHECKSUM"Step 4: Create and Import the Wallet
Use the prepared descriptor to create and load your wallet into Bitcoin Core. First, create a blank, descriptor-based wallet.
For hardware-based recovery, create a watch-only wallet (disable_private_keys=true):
$ bitcoin-cli createwallet "my_recovered_wallet" true true "" false trueFor seed-based recovery, create a standard wallet (disable_private_keys=false):
$ bitcoin-cli createwallet "my_recovered_wallet" false true "" false trueOutput:
{
  "name": "my_recovered_wallet",
  "warning": "Empty string given as passphrase, wallet will not be encrypted.\nWallet is an experimental descriptor wallet"
}
Then import the wallet descriptor. Because we are using a ranged descriptor (/<0;1>/*), only a single import is needed.
$ bitcoin-cli -rpcwallet=my_recovered_wallet importdescriptors "[{\"desc\":\"WALLET_DESCRIPTOR_WITH_CHECKSUM\", \"timestamp\":\"now\", \"active\":true}]"Output:
[
  {
    "success": true,
    "warnings": [
      "Not all private keys provided. Some wallet functionality may return unexpected errors"
    ]
  }
]
Note: The "Not all private keys provided" warning is expected if you imported descriptors with xpubs (hardware-based recovery), but should not appear if you imported xprvs correctly.
Verify that your wallet was imported correctly and that new addresses match what you expect:
$ bitcoin-cli -rpcwallet=my_recovered_wallet listdescriptors
$ bitcoin-cli -rpcwallet=my_recovered_wallet getbalance
$ bitcoin-cli -rpcwallet=my_recovered_wallet getnewaddress
Step 5: Create, Sign, and Broadcast a Transaction
Now that your wallet is active, you can create a transaction to spend funds.
1️⃣ Create a PSBT (Partially Signed Bitcoin Transaction)
$ bitcoin-cli -rpcwallet=my_recovered_wallet walletcreatefundedpsbt '[]' \
'{"bc1qdestinationaddress...":0.001}' 0 '{"fee_rate":2.0}'
Output:
{
  "psbt": "cHNidP8BAH0CAAAAA...",
  "fee": 0.00000324,
  "changepos": 1
}
This creates a PSBT ready for signing.
⏱ Optional: Spending from a Timelocked Path
If your Miniscript policy includes timelock conditions such as older(n) or after(n), you must satisfy those conditions when creating the transaction.
🔹 Absolute Timelock — after(n) (BIP-65)
An absolute timelock prevents spending before a specific block height or timestamp. You must set the transaction's locktime field to a value greater than or equal to n.
- Blocks: If
n < 500,000,000, the timelock is interpreted as a block height.- Example:
after(840000)→ spendable at or after block 840,000.
- Example:
- Time: If
n ≥ 500,000,000, the timelock is interpreted as a Unix timestamp.- Example:
after(1893456000)→ spendable after Jan 1st, 2030.
- Example:
To spend with an absolute timelock path (e.g.: setting locktime to 1893542400 — Jan 2nd, 2030 00:00:00 GMT+0) :
$ bitcoin-cli -rpcwallet=my_recovered_wallet walletcreatefundedpsbt '[]' \
'{"bc1qdestinationaddress...":0.001}' 1893542400 '{"fee_rate":2.0}'
Check the current block height with:
$ bitcoin-cli getblockcount🔹 Relative Timelock — older(n) (BIP-68)
A relative timelock restricts spending until a UTXO has aged long enough. The requirement n must be encoded in the input's sequence field.
The meaning of n depends on its value:
- Blocks: If
n < 0x40000000(Decimal: 1073741824). Each unit = 1 block (≈ 10 minutes).- Example:
older(1000)→ spendable after 1000 blocks (≈ 1 week).
- Example:
- Time: If
n ≥ 0x40000000. Each unit = 512 seconds (≈ 8.5 minutes).- Example:
older(1073741854)→ spendable after 30 units (30×512s ≈ 4h 15m).
- Example:
To spend with a relative timelock path:
- Ensure the UTXO has aged long enough.
- Include the required
nin the specific input’ssequencewhen creating the PSBT. This requires specifying the inputs manually.
$ bitcoin-cli -rpcwallet=my_recovered_wallet walletcreatefundedpsbt \
  '[{"txid":"<txid>","vout":0,"sequence":n}]' \
  '{"bc1qdestinationaddress...":0.001}' 0 '{"fee_rate":2.0}'
If attempted too early, the transaction will be rejected by the network with:
non-BIP68-final (code 64)Note: Timelock usage is optional. Only include these parameters if your wallet script or Miniscript policy requires it.
2️⃣ Sign the PSBT
Depending on your recovery approach:
Option 1: Sign with a Hardware Signer (Recommended)
Ensure HWI is installed. Connect your hardware signer. If the device has a PIN or passphrase, you might have to unlock the device first. Use the following command to list all connected and unlocked hardware signers:
$ hwi enumerateOutput:
[{"type": "coldcard", "model": "coldcard", "label": null, "path": "1-4:1.3", "needs_pin_sent": false, "needs_passphrase_sent": false}]Note: HWI primarily supports hardware signers with a USB connection. Tapsigner, which uses NFC, cannot connect directly to HWI. If your signing policy relies on a Tapsigner, you can import the Tapsigner's private keys into a Coldcard and then use the Coldcard with HWI to sign.
Miniscript Registration and Firmware
Certain hardware signers require the Miniscript wallet to be registered on-device before they can be used to sign transactions. You might also need to upgrade your device firmware to a version that supports Miniscript. Check the hardware vendor’s manual.
Example: Registering a Miniscript wallet on Coldcard (Mk4, Q)
- Update firmware: Ensure your device firmware supports Miniscript (Coldcard Edge firmware).
- Prepare MicroSD: Format a microSD card (up to 32 GB) using the FAT12 or FAT32 file system.
- Export Descriptor: Save the original wallet descriptor (without any modifications) into a
.txtfile and copy that file to the microSD card. - Import on Coldcard:
- Insert the microSD card into your Coldcard.
- On the Coldcard, go to
Settings>Miniscript>Import. - Press (1) to import the Miniscript wallet file from the SD Card.
Signing the Transaction
Sign the PSBT on your connected device. Replace <device_type> (e.g., coldcard, jade, ledger) with the type returned by the enumerate command, and <psbt_string> with the PSBT generated in the previous step.
$ hwi --device-type <device_type> signtx <psbt_string>Output:
{
  "psbt": "cHNidP8BAH0CAAAAAT+..."
}
If you have a multisig or multi-key Miniscript policy, repeat this step for the required number of signers, passing the newly signed PSBT to the next signer.
Note: If you can't sign sequentially (i.e., each signer signs independently), you can combine all partially signed PSBTs containing different signatures into one final PSBT with:
$ bitcoin-cli combinepsbt '["psbt1","psbt2"]'Option 2: Sign with Bitcoin Core (Seed-based)
If you imported the private keys (xprvs) directly into Bitcoin Core:
$ bitcoin-cli -rpcwallet=my_recovered_wallet walletprocesspsbt "<psbt_string>"Output:
{
  "psbt": "cHNidP8BAH0CAAAAAT+...",
  "complete": true
}
3️⃣ Finalize and Broadcast
Once the PSBT is fully signed (the complete status is true), finalize it to extract the raw transaction hex:
$ bitcoin-cli -rpcwallet=my_recovered_wallet finalizepsbt "<signed_psbt>"Output:
{
  "hex": "02000000000101...",
  "complete": true
}
Finally, broadcast the raw transaction hex (from the "hex" field above) to the network:
$ bitcoin-cli sendrawtransaction "<raw_transaction_hex>"Output (Transaction ID):
b91276af8b6f5ede632aadfb87bf8a9209a43d0a030396cd0c4629a1ec92b87aStep 6: Clean Up
After confirming the recovery and that your funds have been moved, securely delete temporary wallets or files, especially if you used the seed-based recovery method.
First, unload the wallet from Bitcoin Core:
$ bitcoin-cli -rpcwallet=my_recovered_wallet unloadwalletThen, you may remove the wallet directory:
$ rm -rf ~/.bitcoin/wallets/my_recovered_wallet