Recover a Nunchuk Wallet with Sparrow
Nunchuk was developed using open tools and standards. That means a wallet created in Nunchuk can be easily recovered elsewhere.
In this guide, we will walk you through how to recover a Nunchuk multisig wallet with Sparrow, a popular desktop Bitcoin wallet.
Update (July 26, 2023)
Since Sparrow v1.7.3 and Nunchuk's latest releases (iOS v1.9.28, Android v1.9.33 and Desktop v1.9.20), the wallet recovery process has been been greatly simplified, thanks to the adoption of BIP48 and BIP129 standards.
An overview of the updated recovery process:
- Export the wallet configuration (BSMS file)
- Import wallet into Sparrow
- Import keys into Sparrow
Export the wallet configuration (BSMS file)
If you don't have a copy of the wallet configuration (BSMS file) already, navigate to your wallet in Nunchuk:
View wallet config > More menu (top right of the screen) > Export wallet configuration > Select BSMS as the export format.
Save the file.
Import wallet into Sparrow
In Sparrow, import the multisig wallet:
File > Import Wallet > BSMS > Import File > Select the BSMS file that you saved in the previous step.
Give it a few seconds to sync. When it's finished, you should be able to see your wallet's existing transactions and latest balance.
Import keys into Sparrow
Under the recovered wallet's settings, pair your signing devices with the corresponding keystores.
If your signing device has a USB connection: Keystore > Import > Connected Hardware Wallet.
If your signing device uses QR codes or NFC: Keystore > Import > Airgapped Hardware Wallet.
(Note that for NFC devices, a NFC reader might be required.)
If you no longer have the original device, you can alternatively recover the key by using your seed phrase or private key backup: Keystore > Import > Software Wallet. Select Mnemonic Words (BIP39) for seed phrase, or Master Private Key (BIP32) for the raw private key.
After importing the keys, you can sweep the wallet.
Original article (December 24, 2022)
Prerequisites
- The wallet configuration file
- Enough seeds or master private keys to meet the signature requirement for a sweep. For example, for a 2-of-4 multisig wallet, you will need either 2 seeds, 2 master private keys, or 1 seed and 1 master private key.
Important notes before you begin
(a) If you have a TAPSIGNER in your setup, you can learn how to extract its master private key here.
(b) Importing a key during wallet recovery requires knowing the key's BIP32 derivation path. Nunchuk defaults to using Native SegWit multisig wallets which typically use these paths:
- For keys created in common hardware signing devices:
m/48h/0h/0h/2h - For keys created in Nunchuk, including the TAPSIGNER:
m/48h/0h/0h
If you are unsure, you can always get the path information for your keys from the wallet configuration file.
(c) Both Nunchuk and Sparrow sort keys automatically. This means during recovery you can import keys in any order. For example, if you had created a multisig wallet by adding keys A —> B —> C —> D sequentially, during recovery you can import them as B —> D —> A —> C, or any other order, and it will still be able to reconstruct the same wallet.
(d) An alternative to importing seed phrases is to add the original signing devices that were initialized with those seed phrases to Sparrow (if you still have access to the devices). To do so, under Sparrow's wallet settings, select either “Connected Hardware Wallet” or “Airgapped Hardware Wallet”, depending on your device type.
Recovery overview
- Retrieve the wallet configuration file
- Create a new wallet in Sparrow
- Restore keys using seeds or master private keys
- Add the rest of the keys as XPUBs
- Sweep the wallet
Guide
Step 1
You can export your wallet's configuration at any time from inside the Nunchuk app. It is a good idea to back up the wallet configuration in another place besides Nunchuk, such as in a password-protected cloud storage, your personal drive or email.
Nunchuk supports multiple wallet configuration formats and natively uses BSMS, which is based on BIP129. For this guide however, we will use the COLDCARD format, which is compatible with Sparrow and is human-readable.
To get the configuration in the COLDCARD format, navigate to your wallet in Nunchuk, tap on “View wallet config”, then tap on the 3-dot menu (top right of the screen). Select “Export wallet to COLDCARD” and choose the file option.
You will be prompted to save a text file. Once downloaded, open the file using any text editor. The file should look similar to the one on the right of the image below. In this example, we will be recovering a 2-of-4 multisig wallet (a Honey Badger wallet).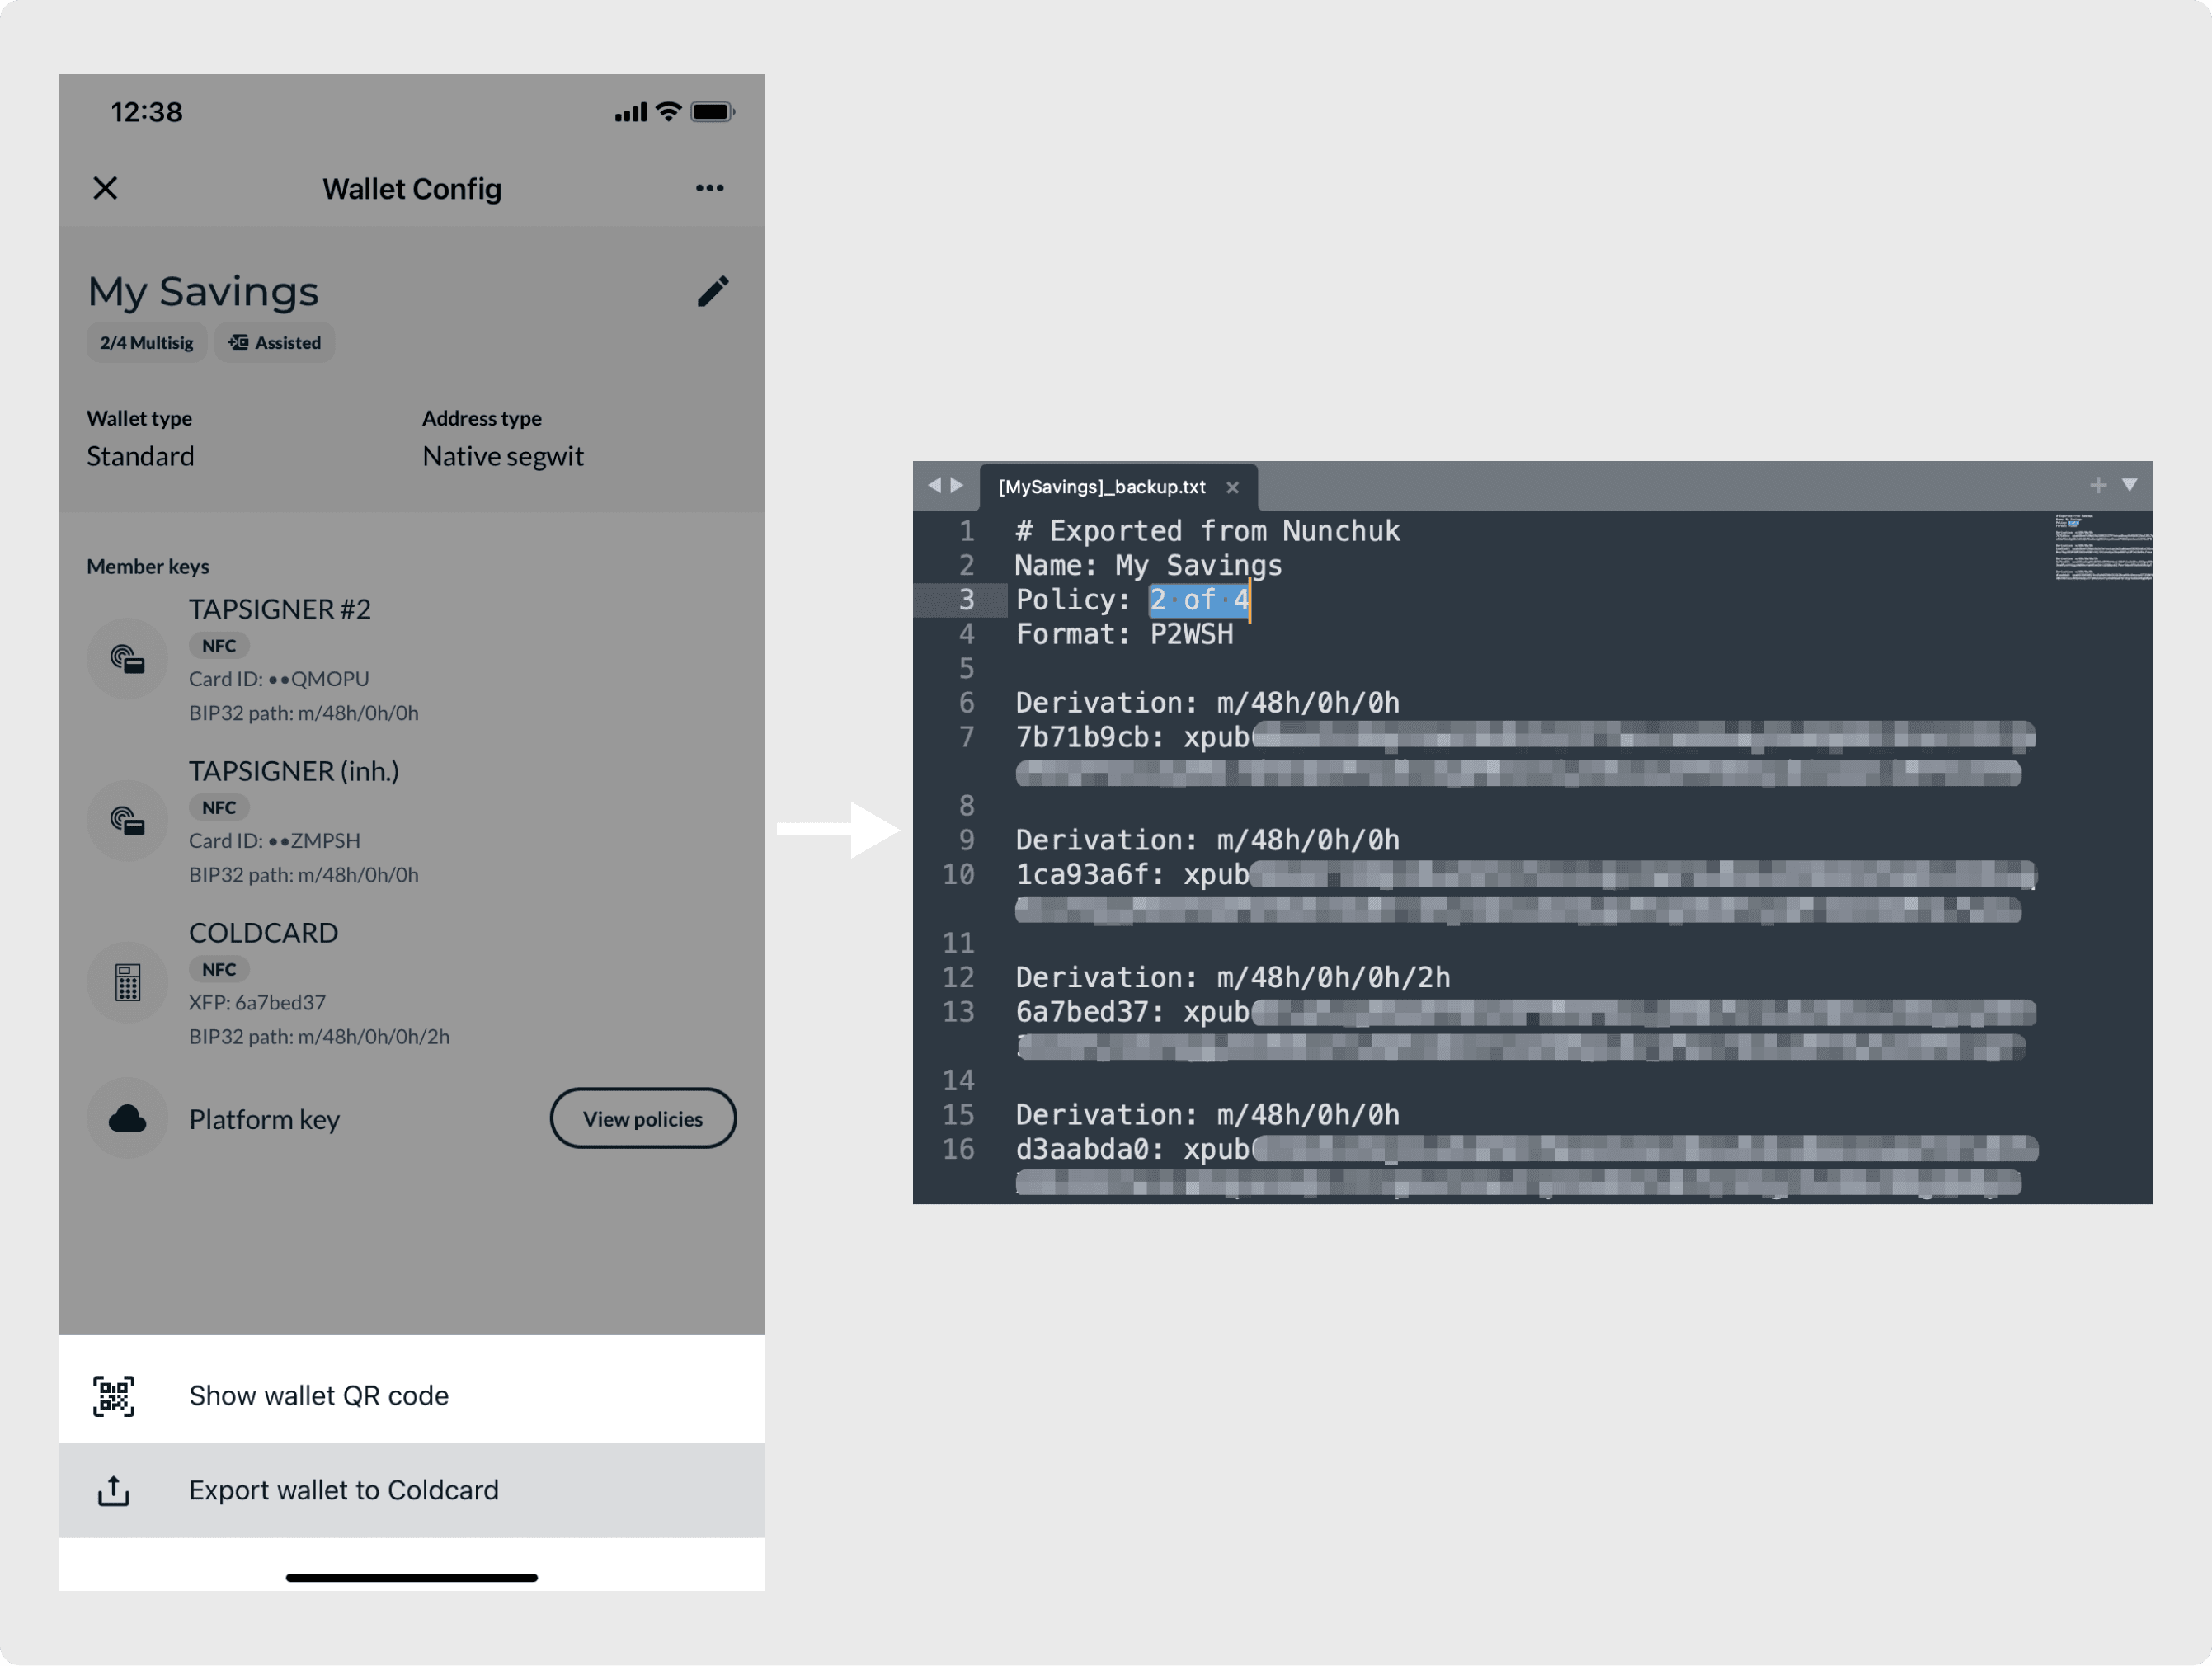
Step 2
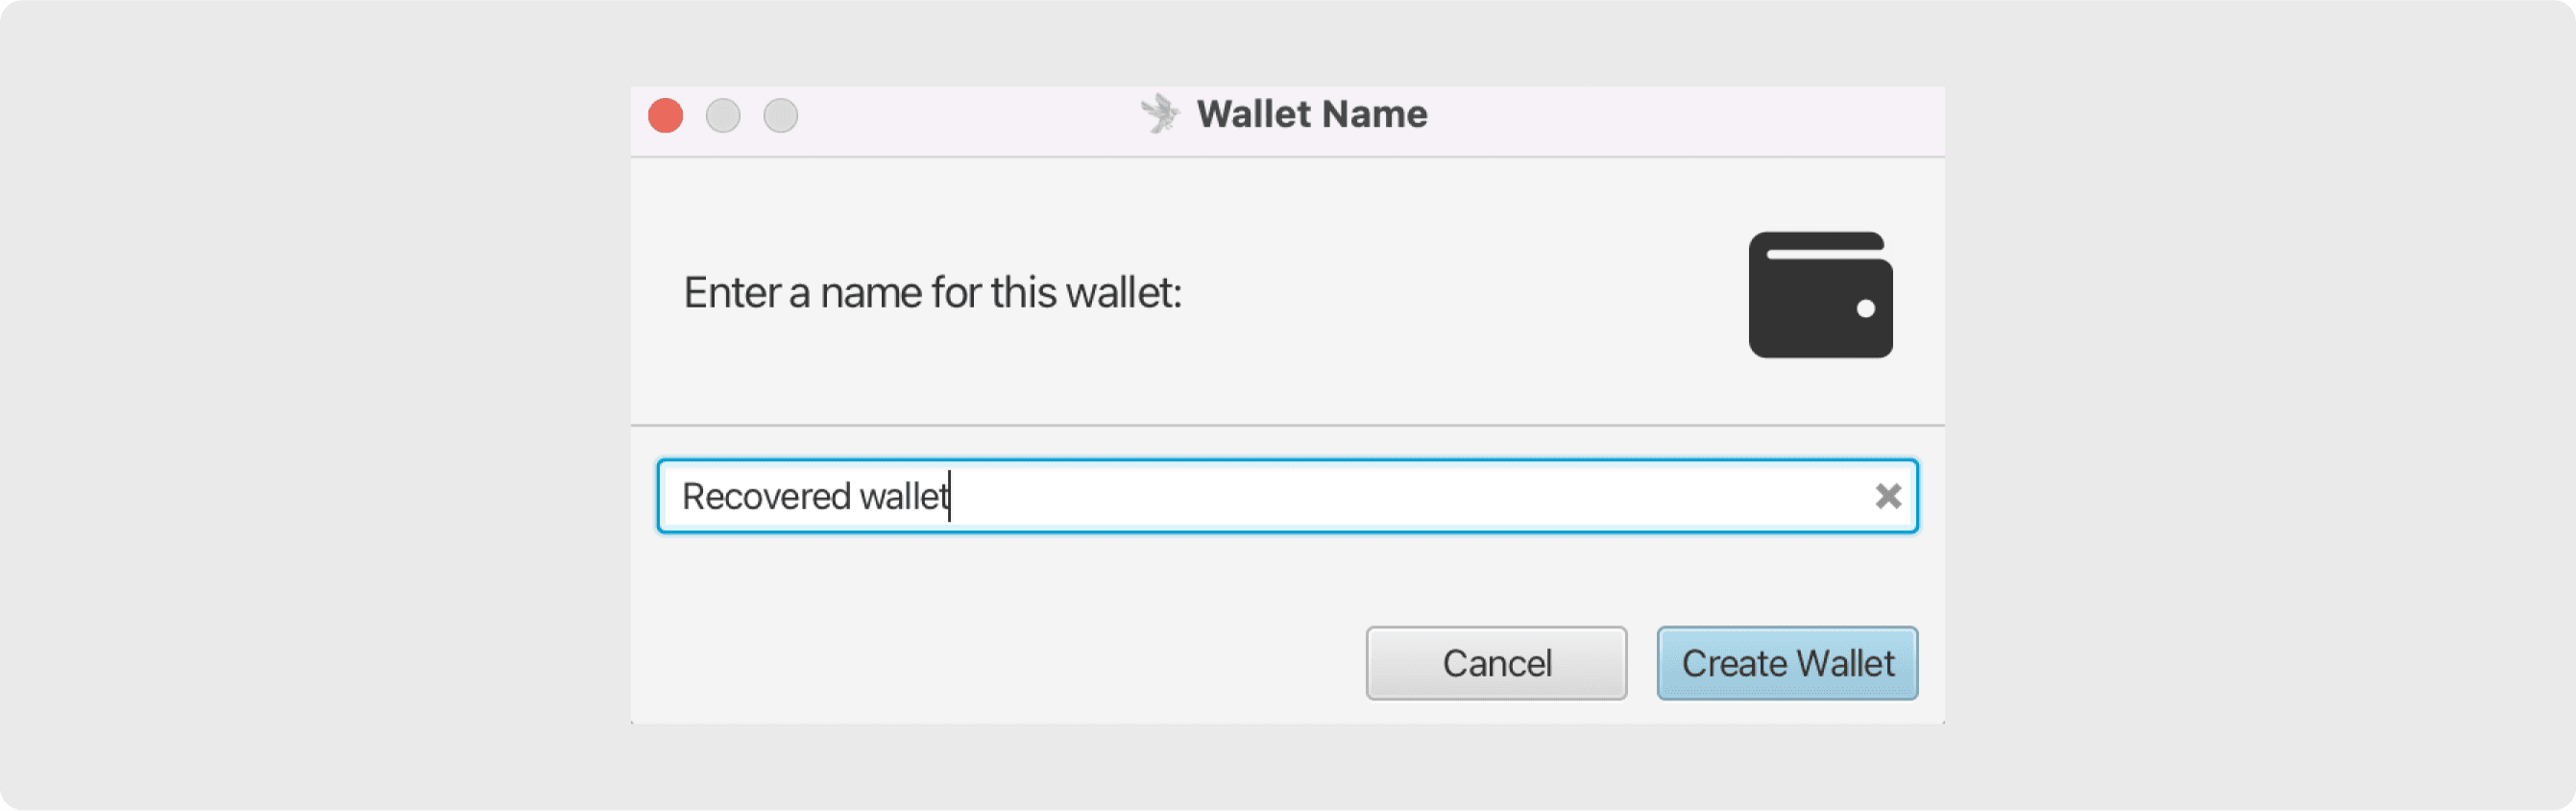
Once you have a copy of the wallet configuration file, proceed to download and install Sparrow Wallet on your computer.
Create a new wallet in Sparrow and name it “Recovered wallet”.
Switch to Multi-Signature and adjust the M and N parameters on the Cosigners slider, so that they match your wallet configuration.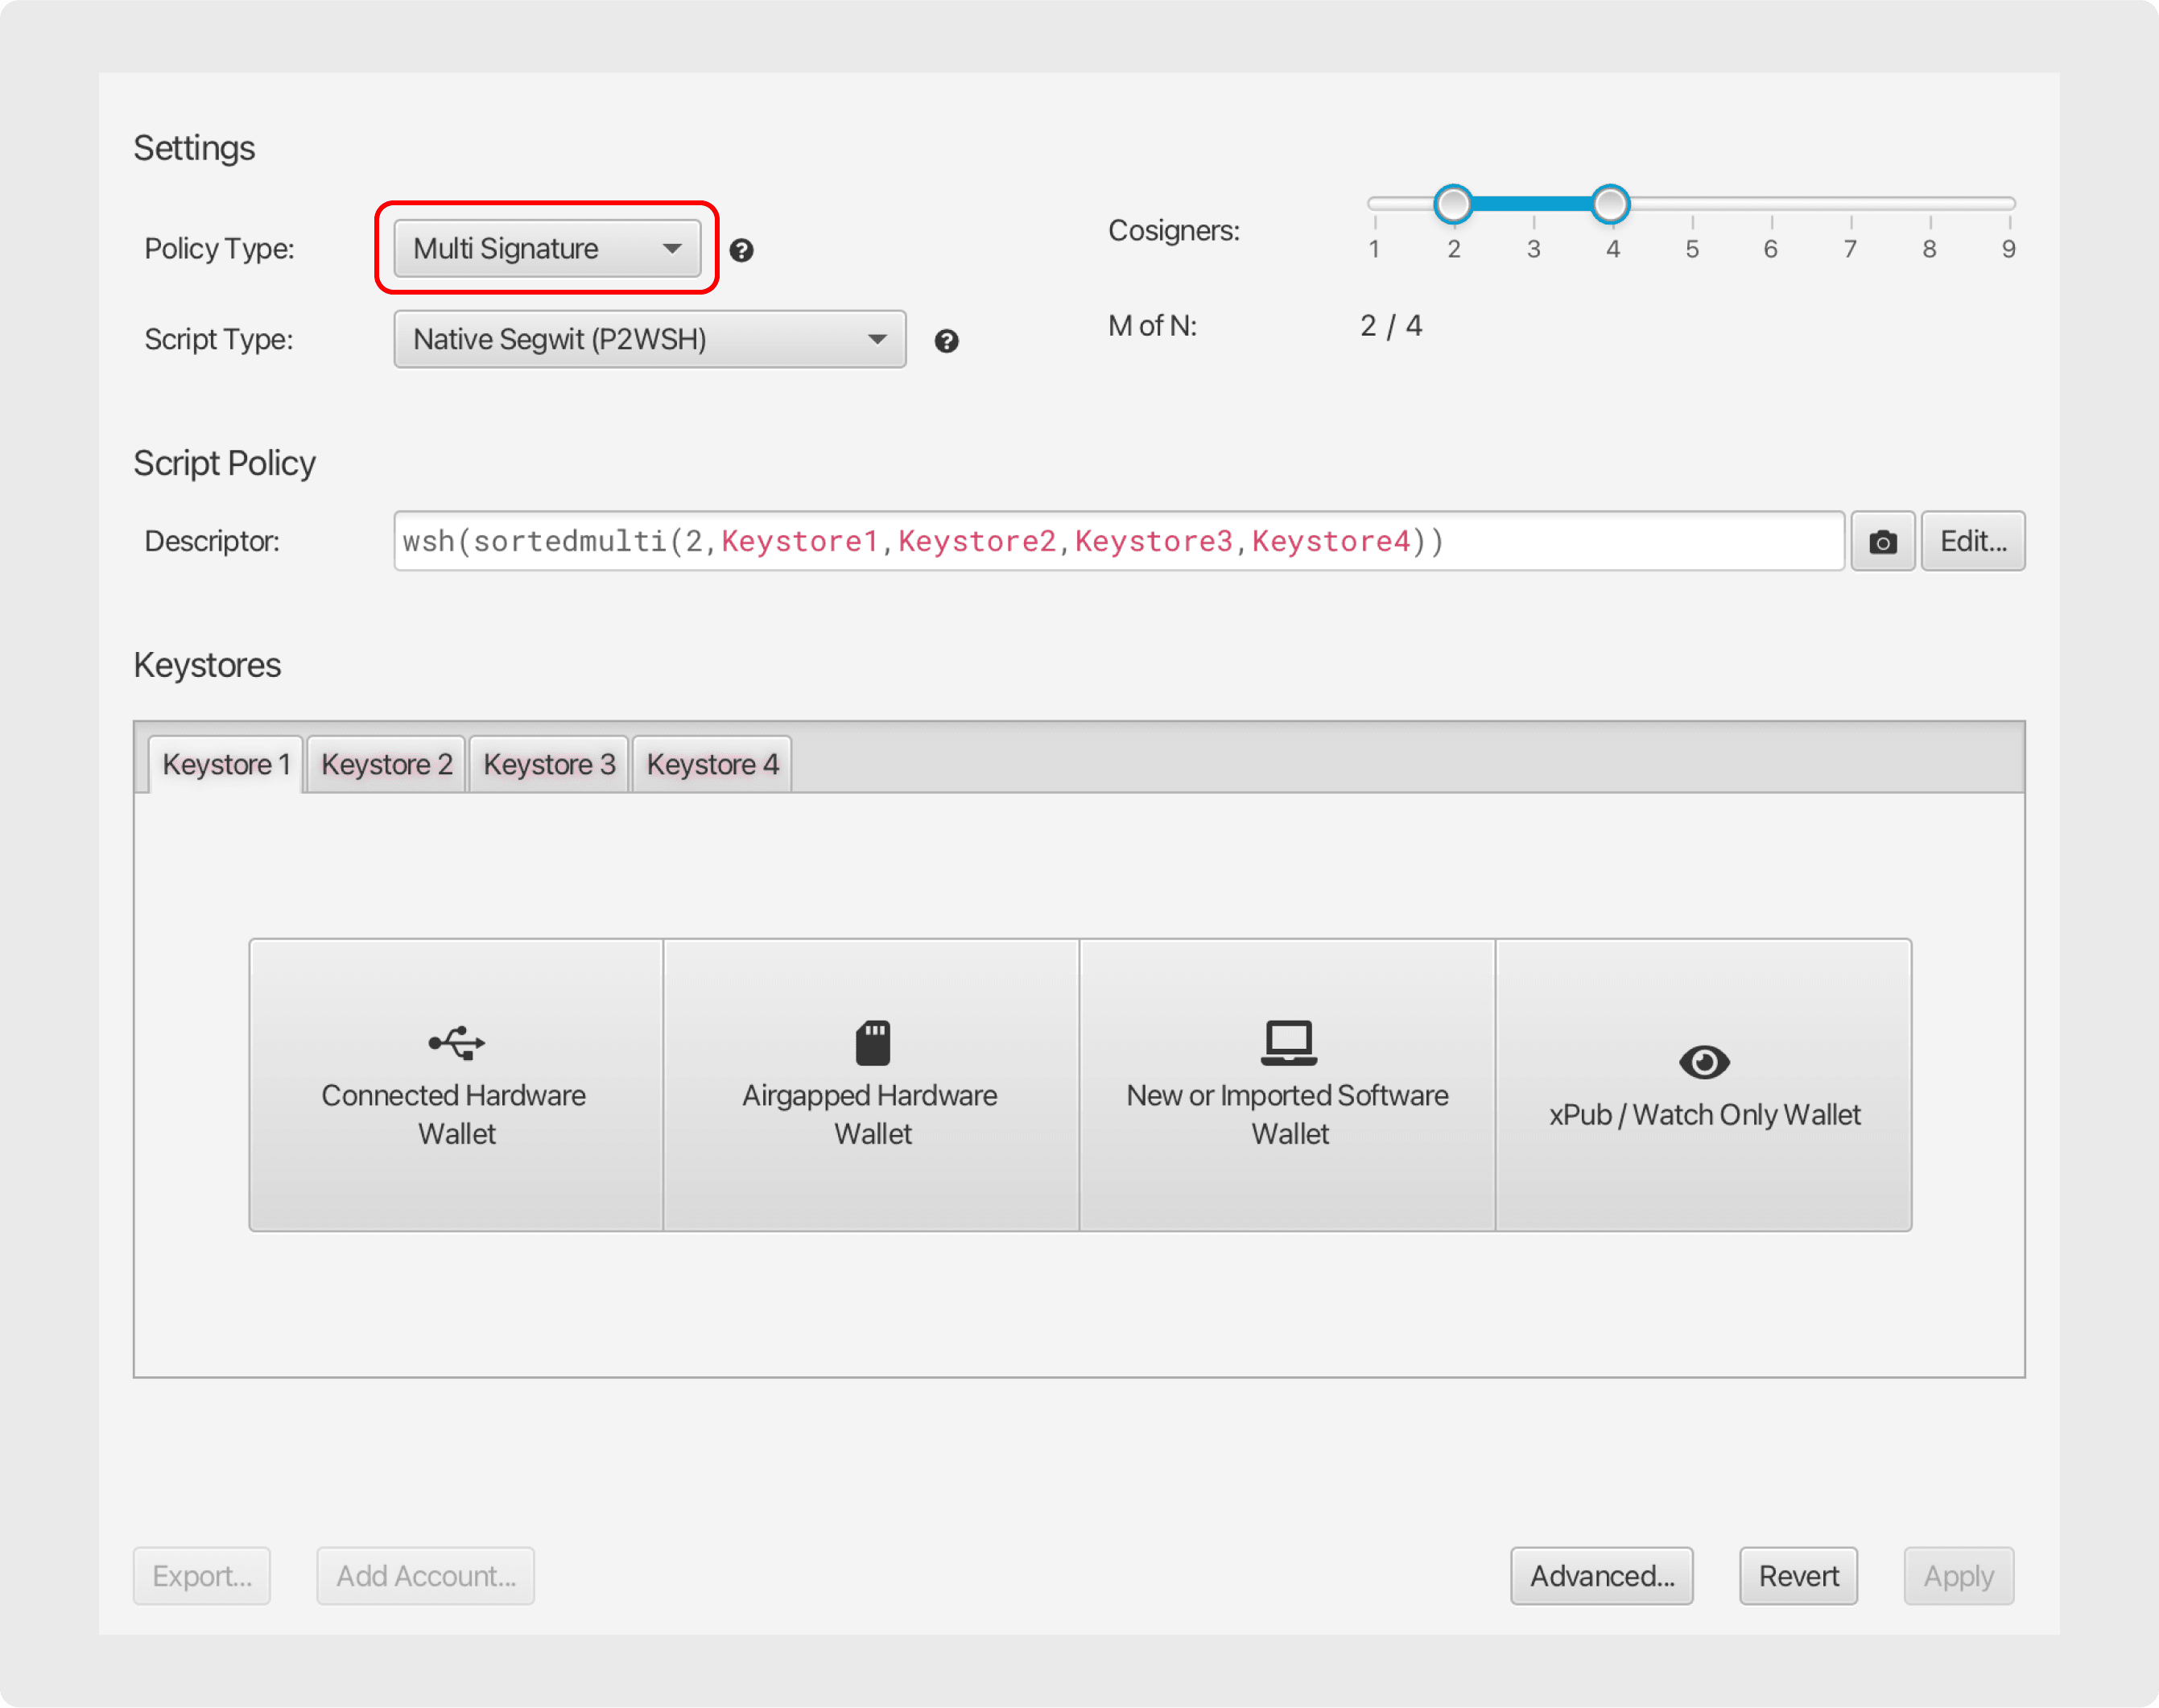
Step 3
Now you can start restoring the keys one-by-one by using either the seeds, the master private keys, or the extended public keys (XPUBs).
To restore a key using a master private key: Navigate to Settings, under one of the unused Keystore tabs, click “New or Imported Software Wallet” —> “Master Private Key (BIP32)” —> “Enter Private Key”, then paste in the master private key and click “Import”.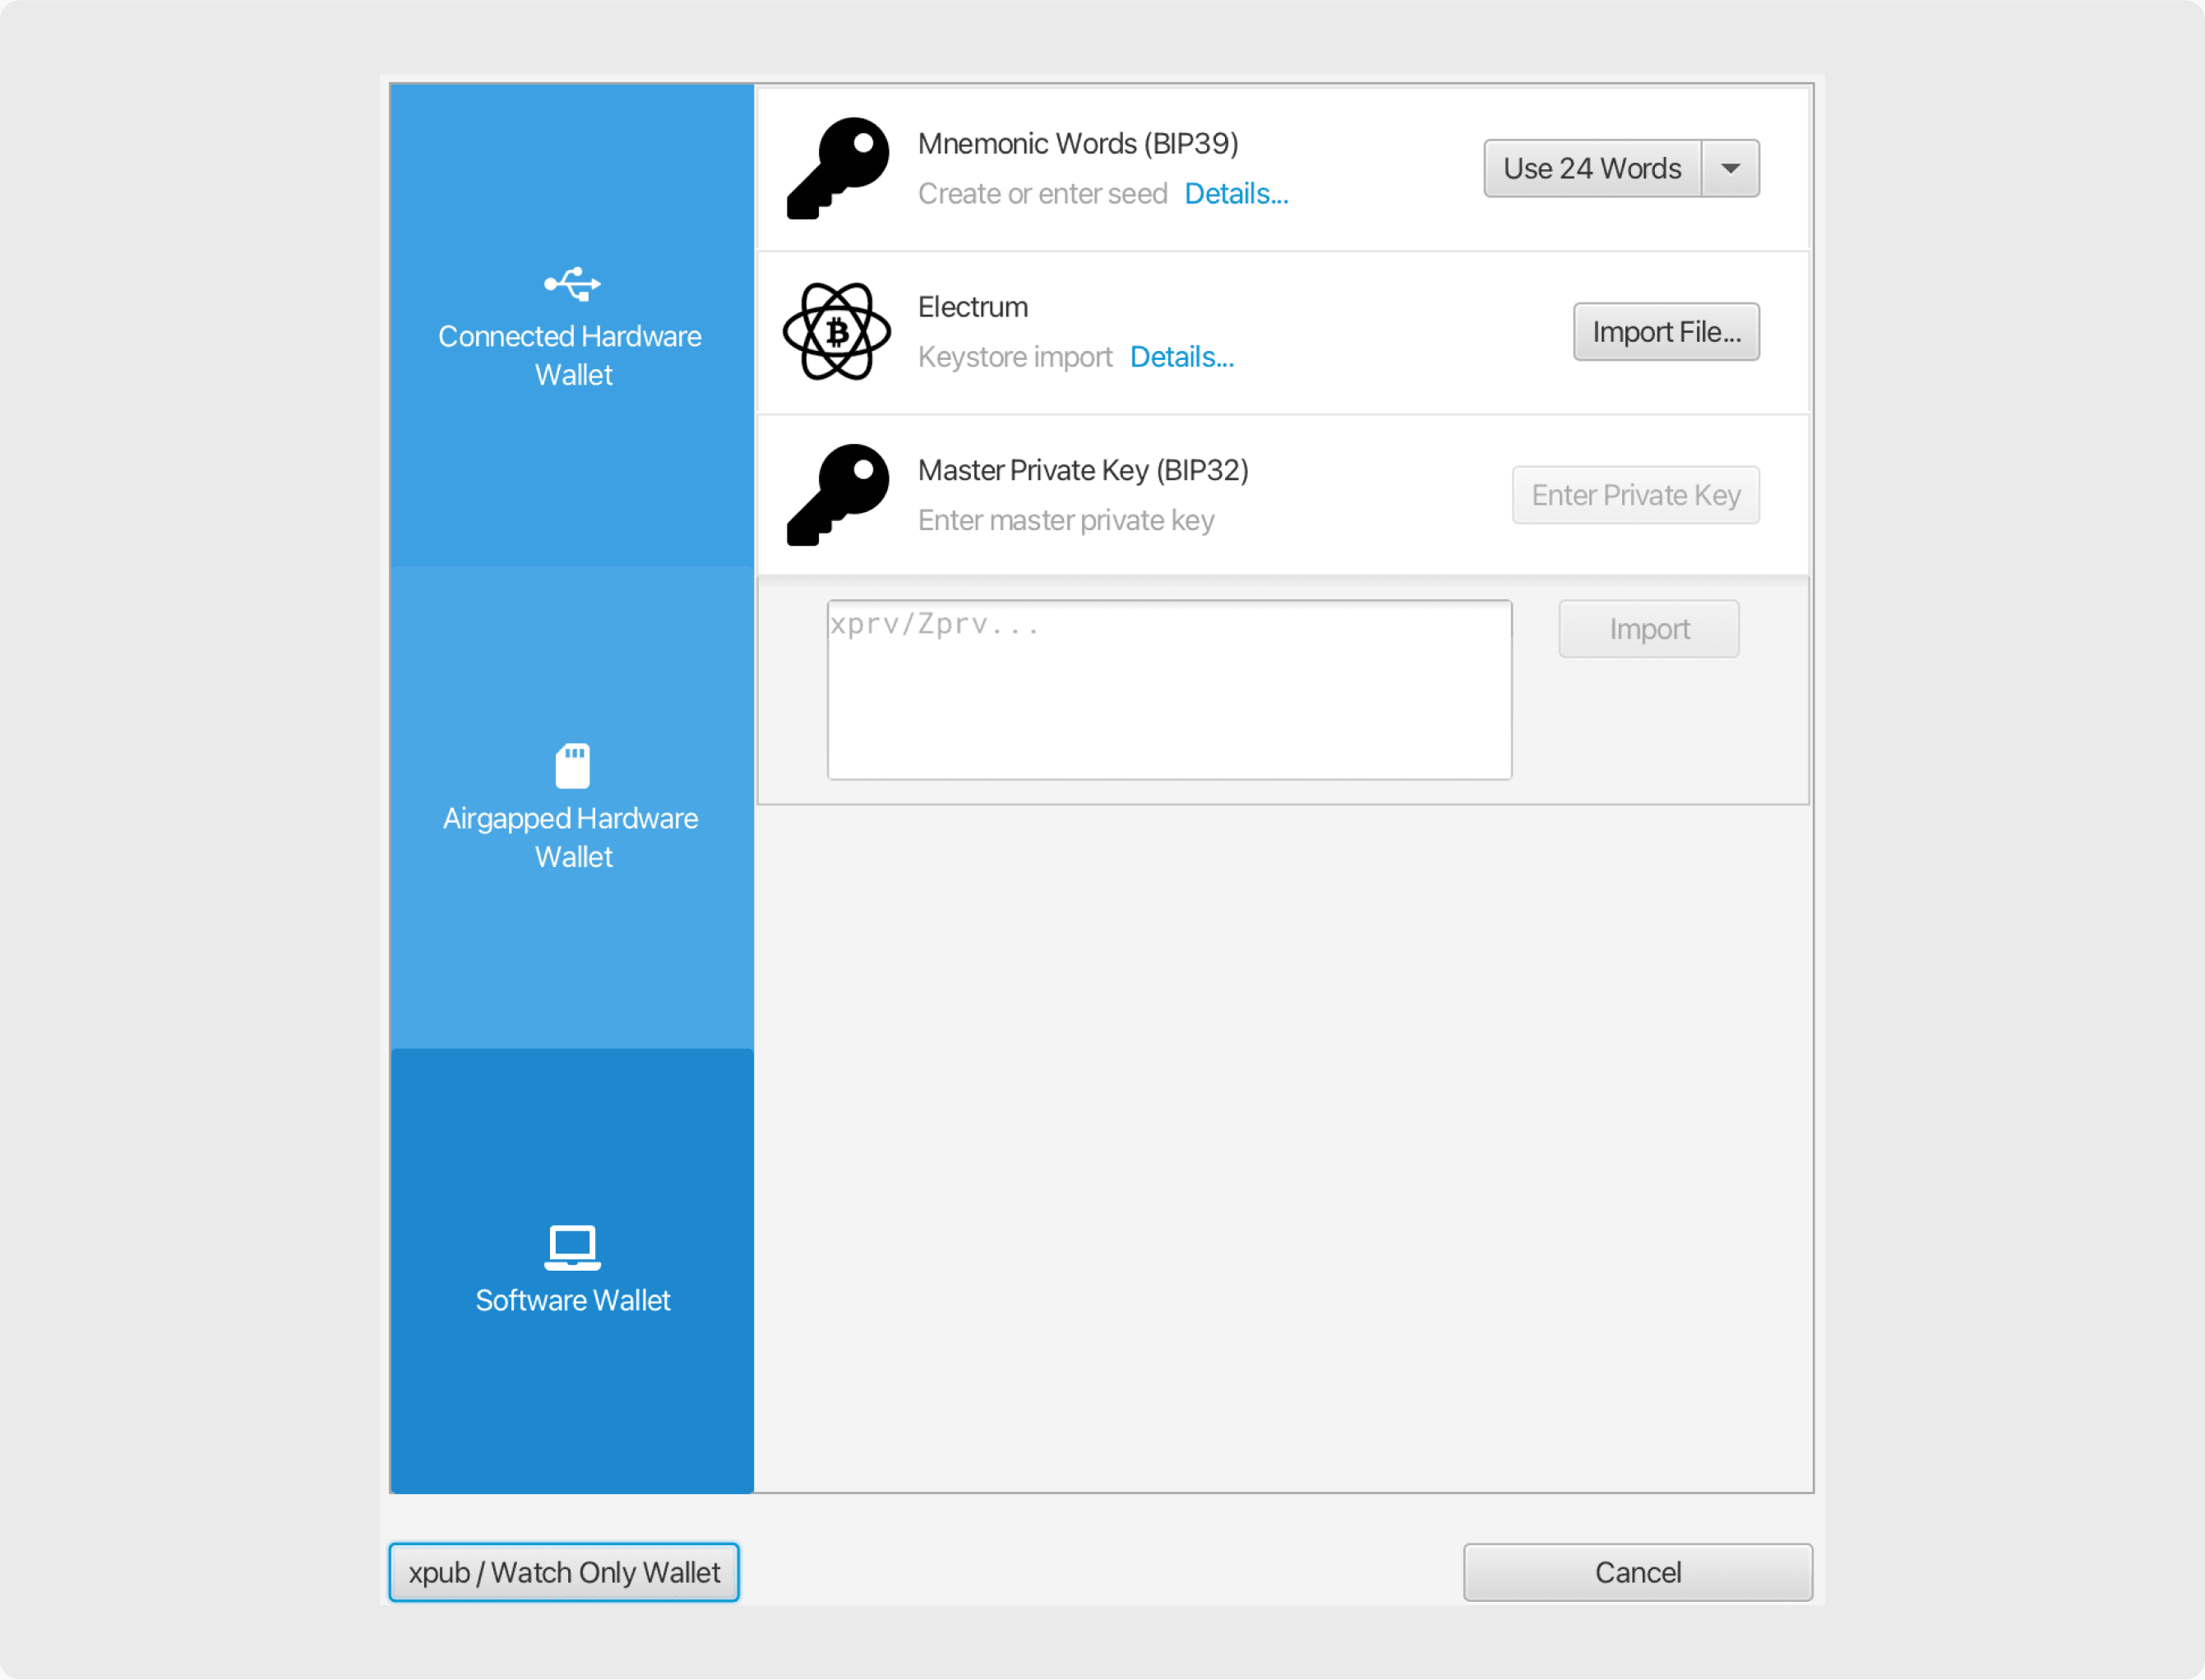
You will be prompted to enter the derivation path for the key. In this example, the first key we are importing is a TAPSIGNER, so its path is m/48h/0h/0h (if unsure, review the wallet configuration file).m/48h/0h/0h can also be written as m/48’/0’/0’ (the characters h and ‘ are interchangeable), as shown in the image here.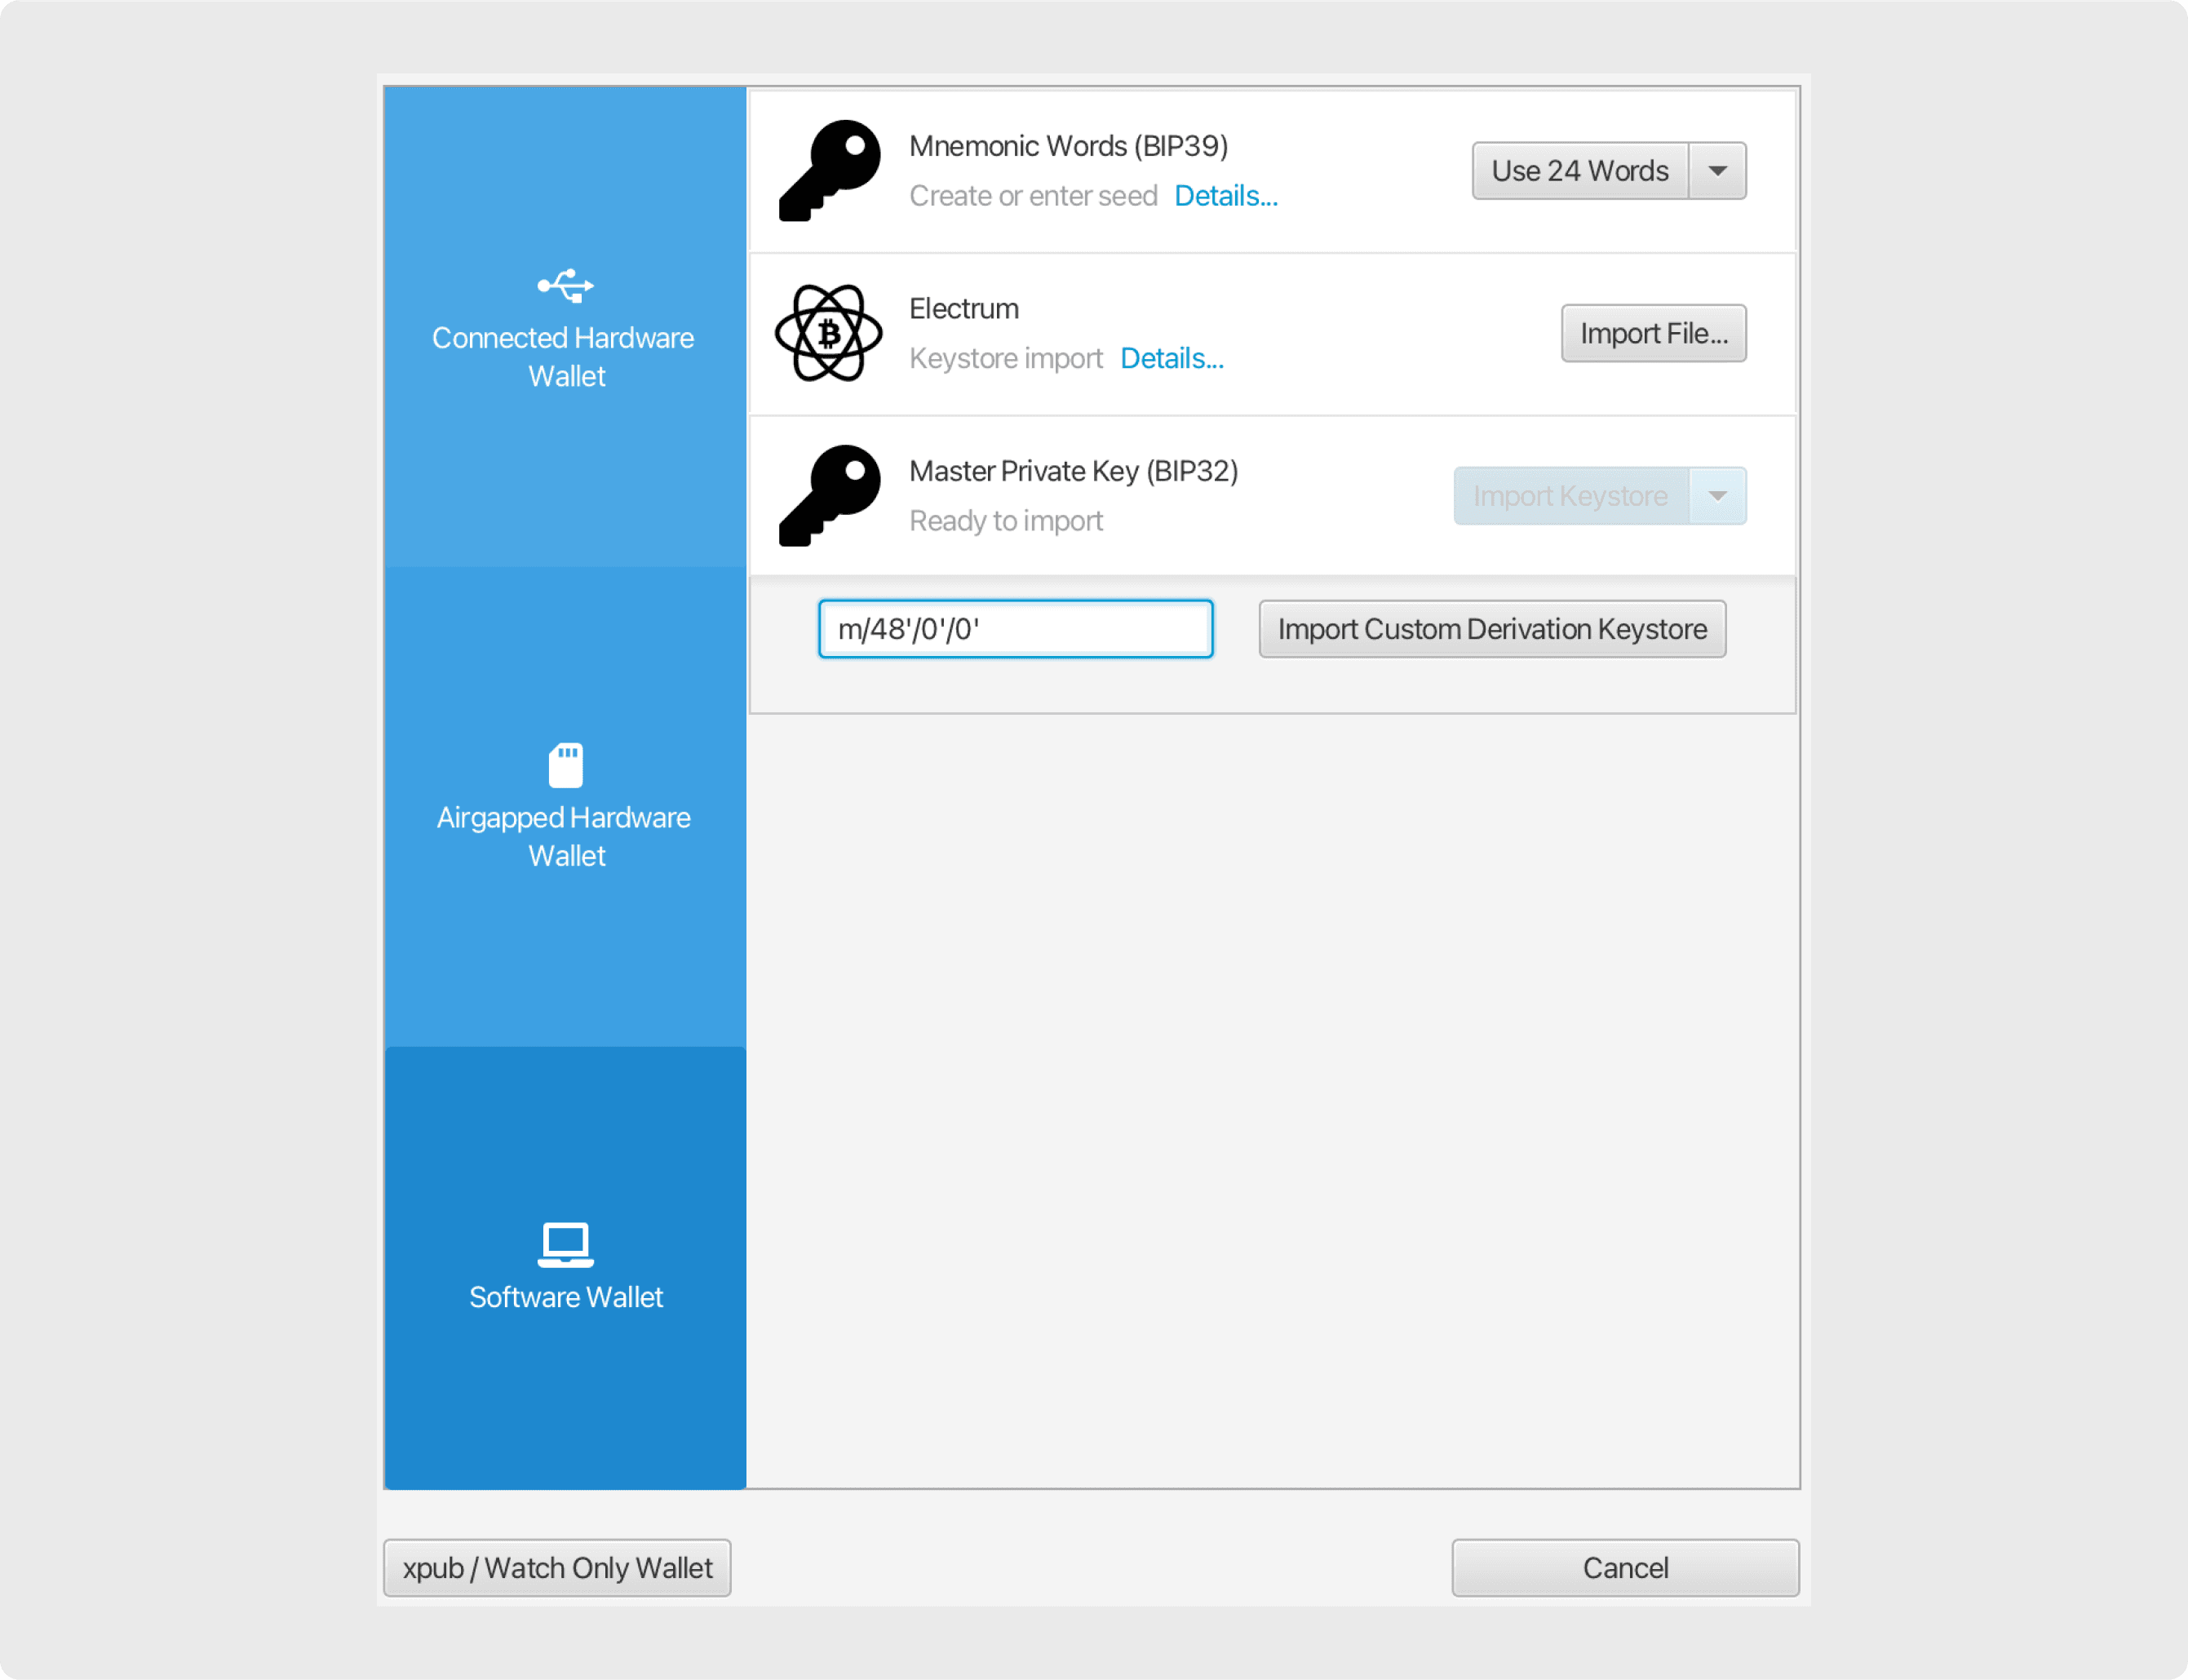
Take note of the master fingerprint of the key. You can optionally change the key label. 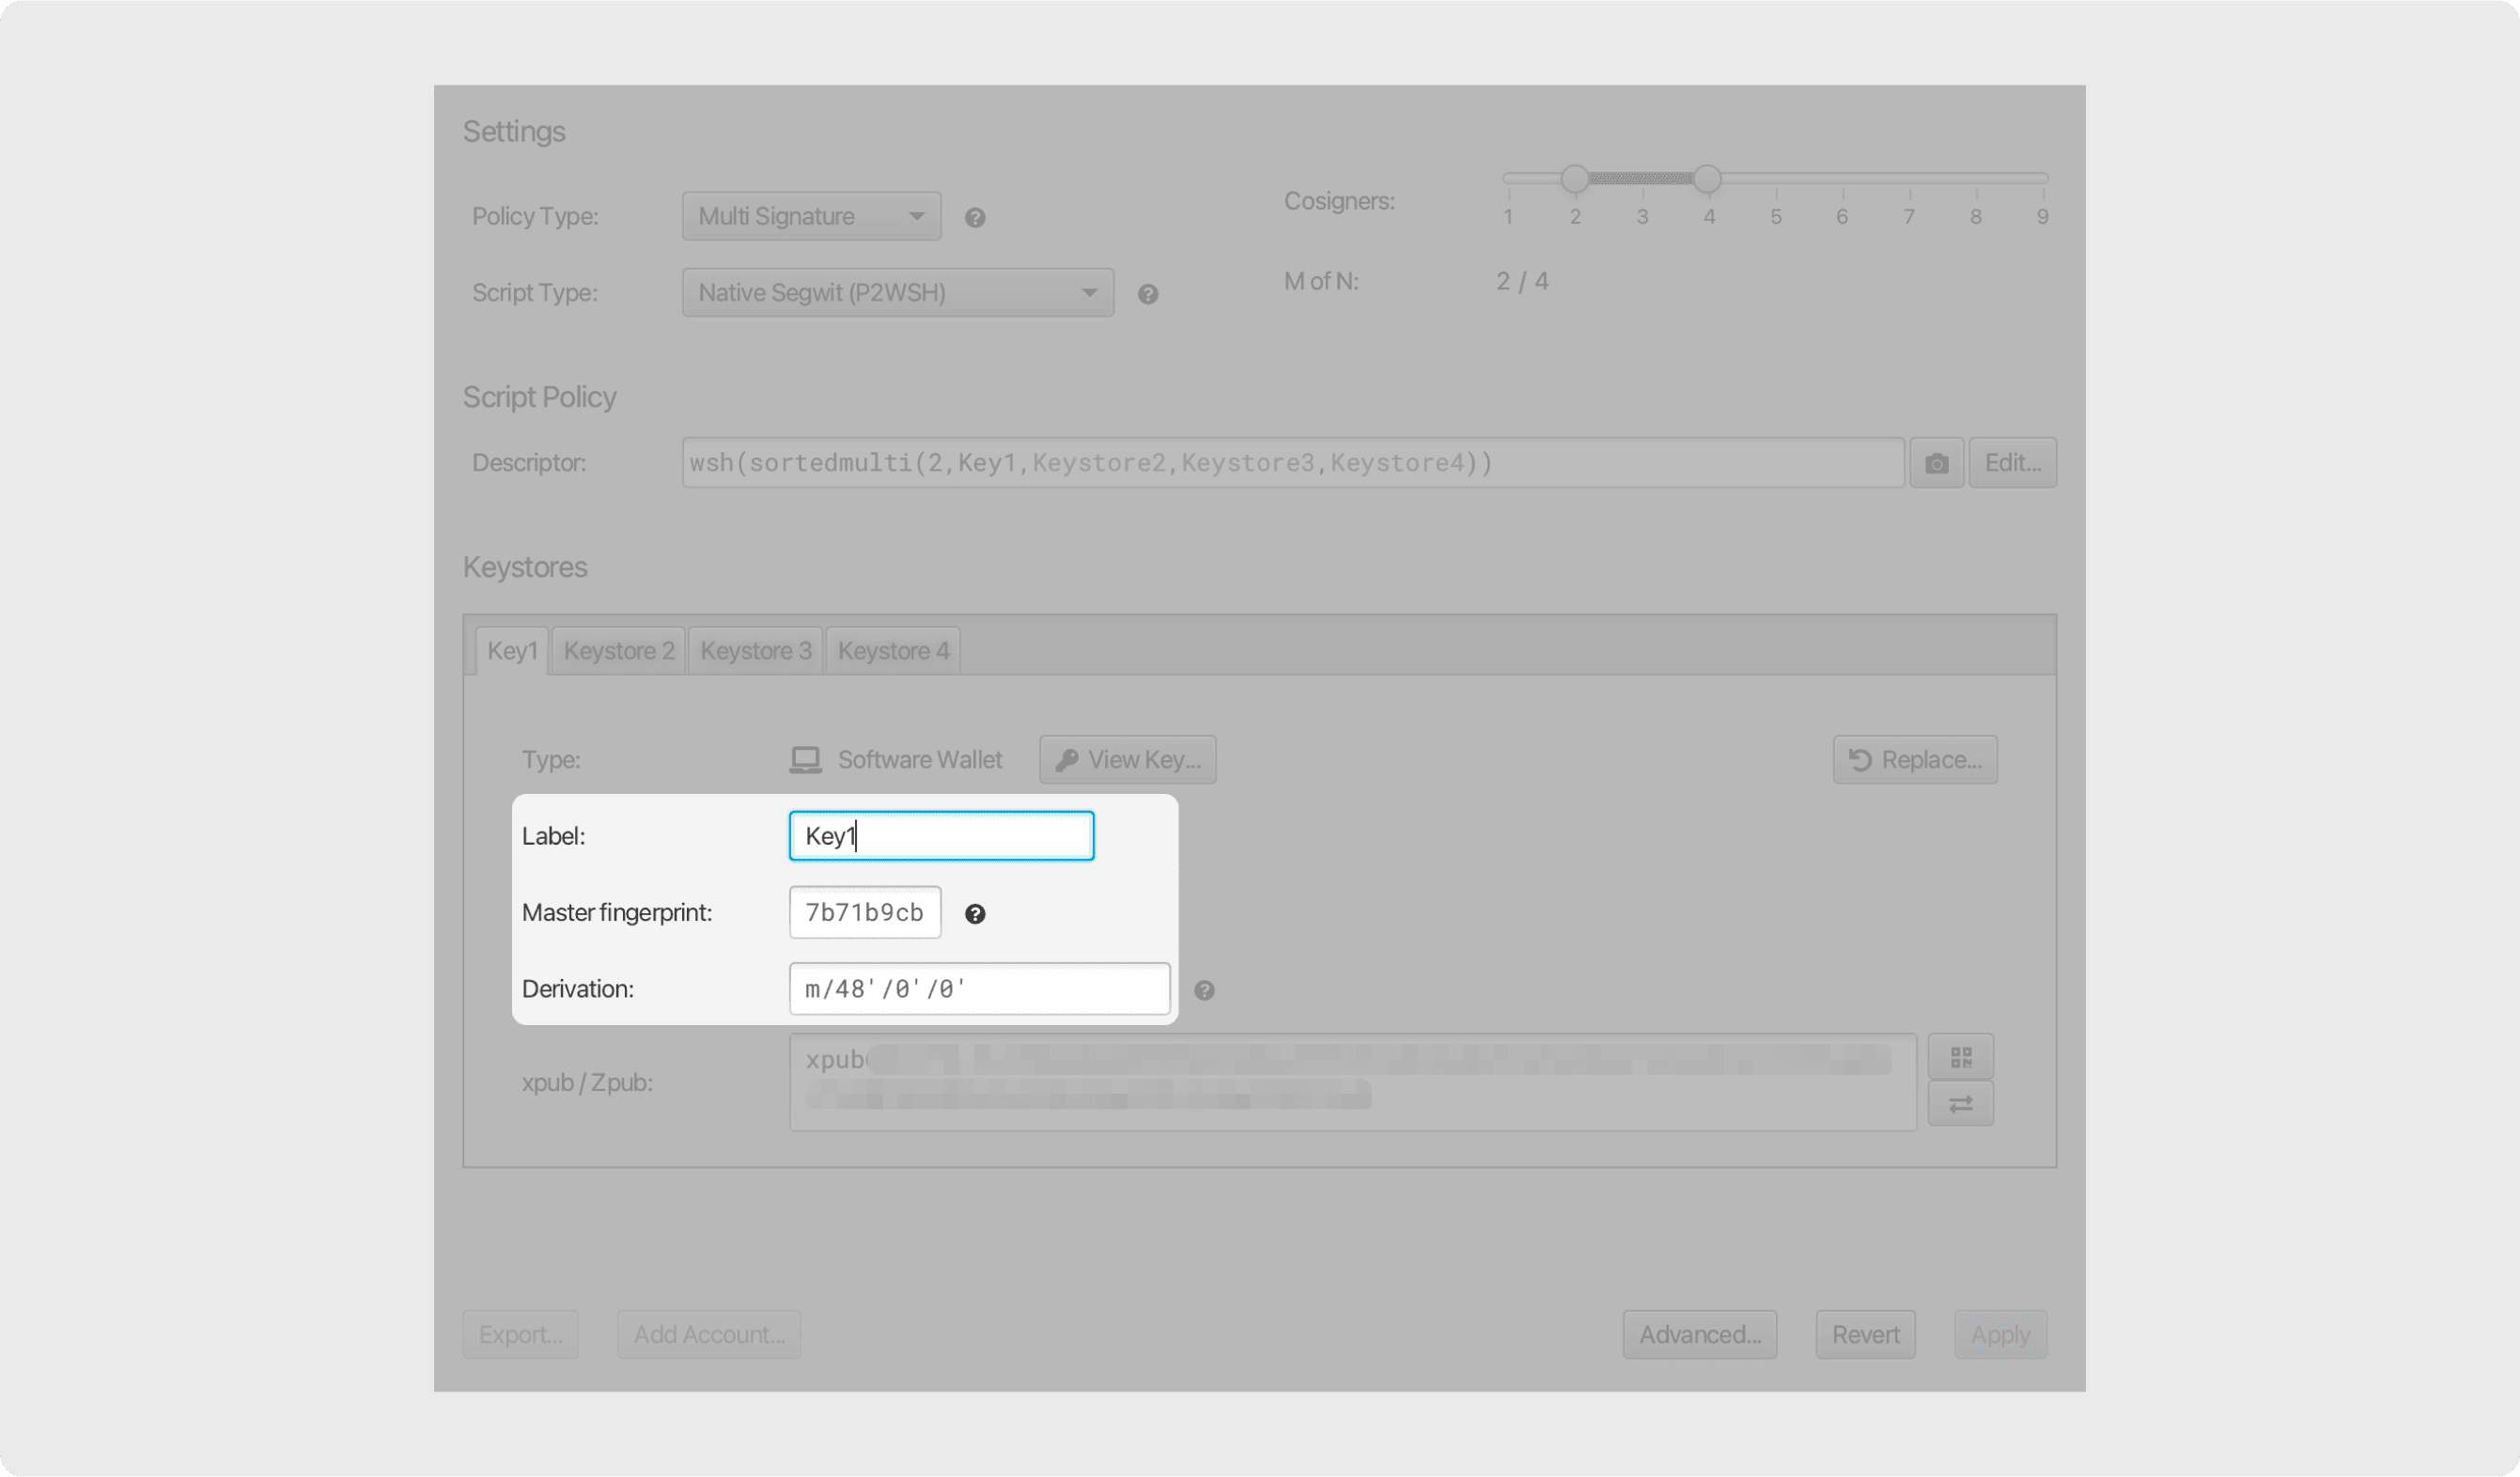
To restore a key using a seed phrase: Switch to an unused Keystore tab, click “New or Imported Software Wallet”. Under “Mnemonic Words (BIP39)”, choose either the 24-word or 12-word option, depending on the length of your seed phrase. Enter your seed phrase. If there was a passphrase, you must enter that as well. Then click “Create Keystore”.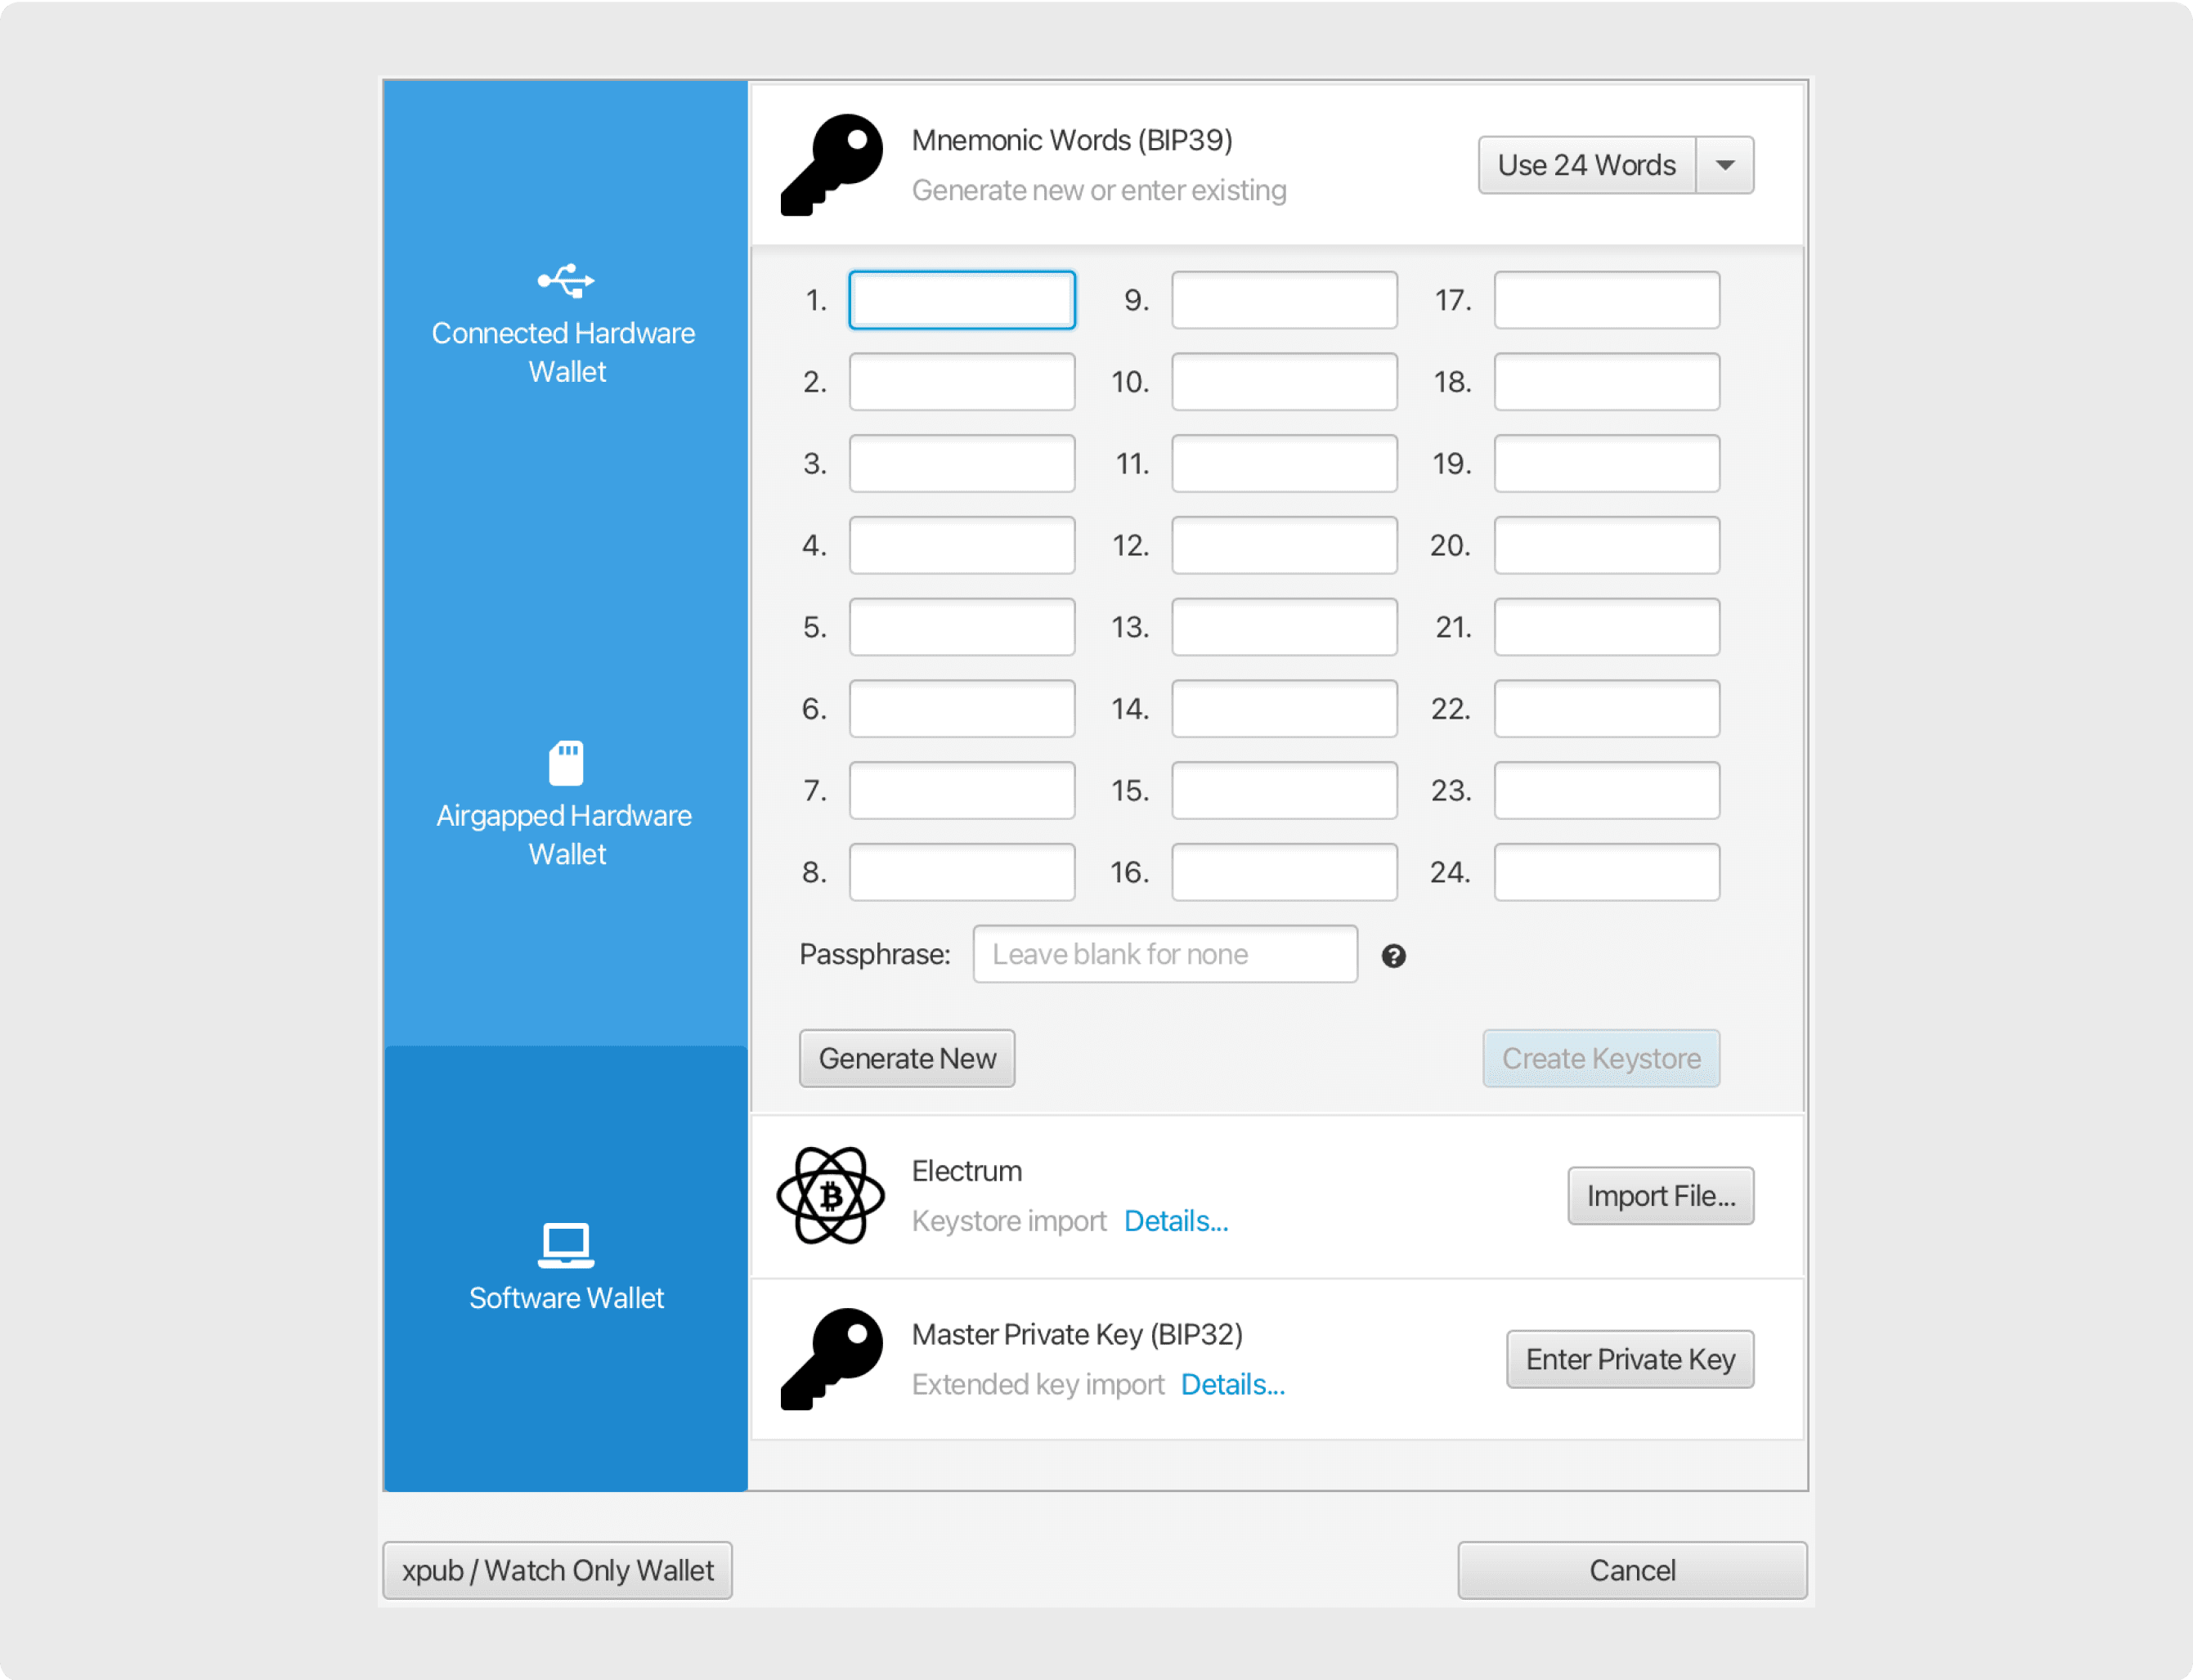
Again you will be prompted to enter the derivation path for the key. In this example, the second key we are importing was created in COLDCARD, so its path is m/48h/0h/0h/2h (if unsure, review the wallet configuration file).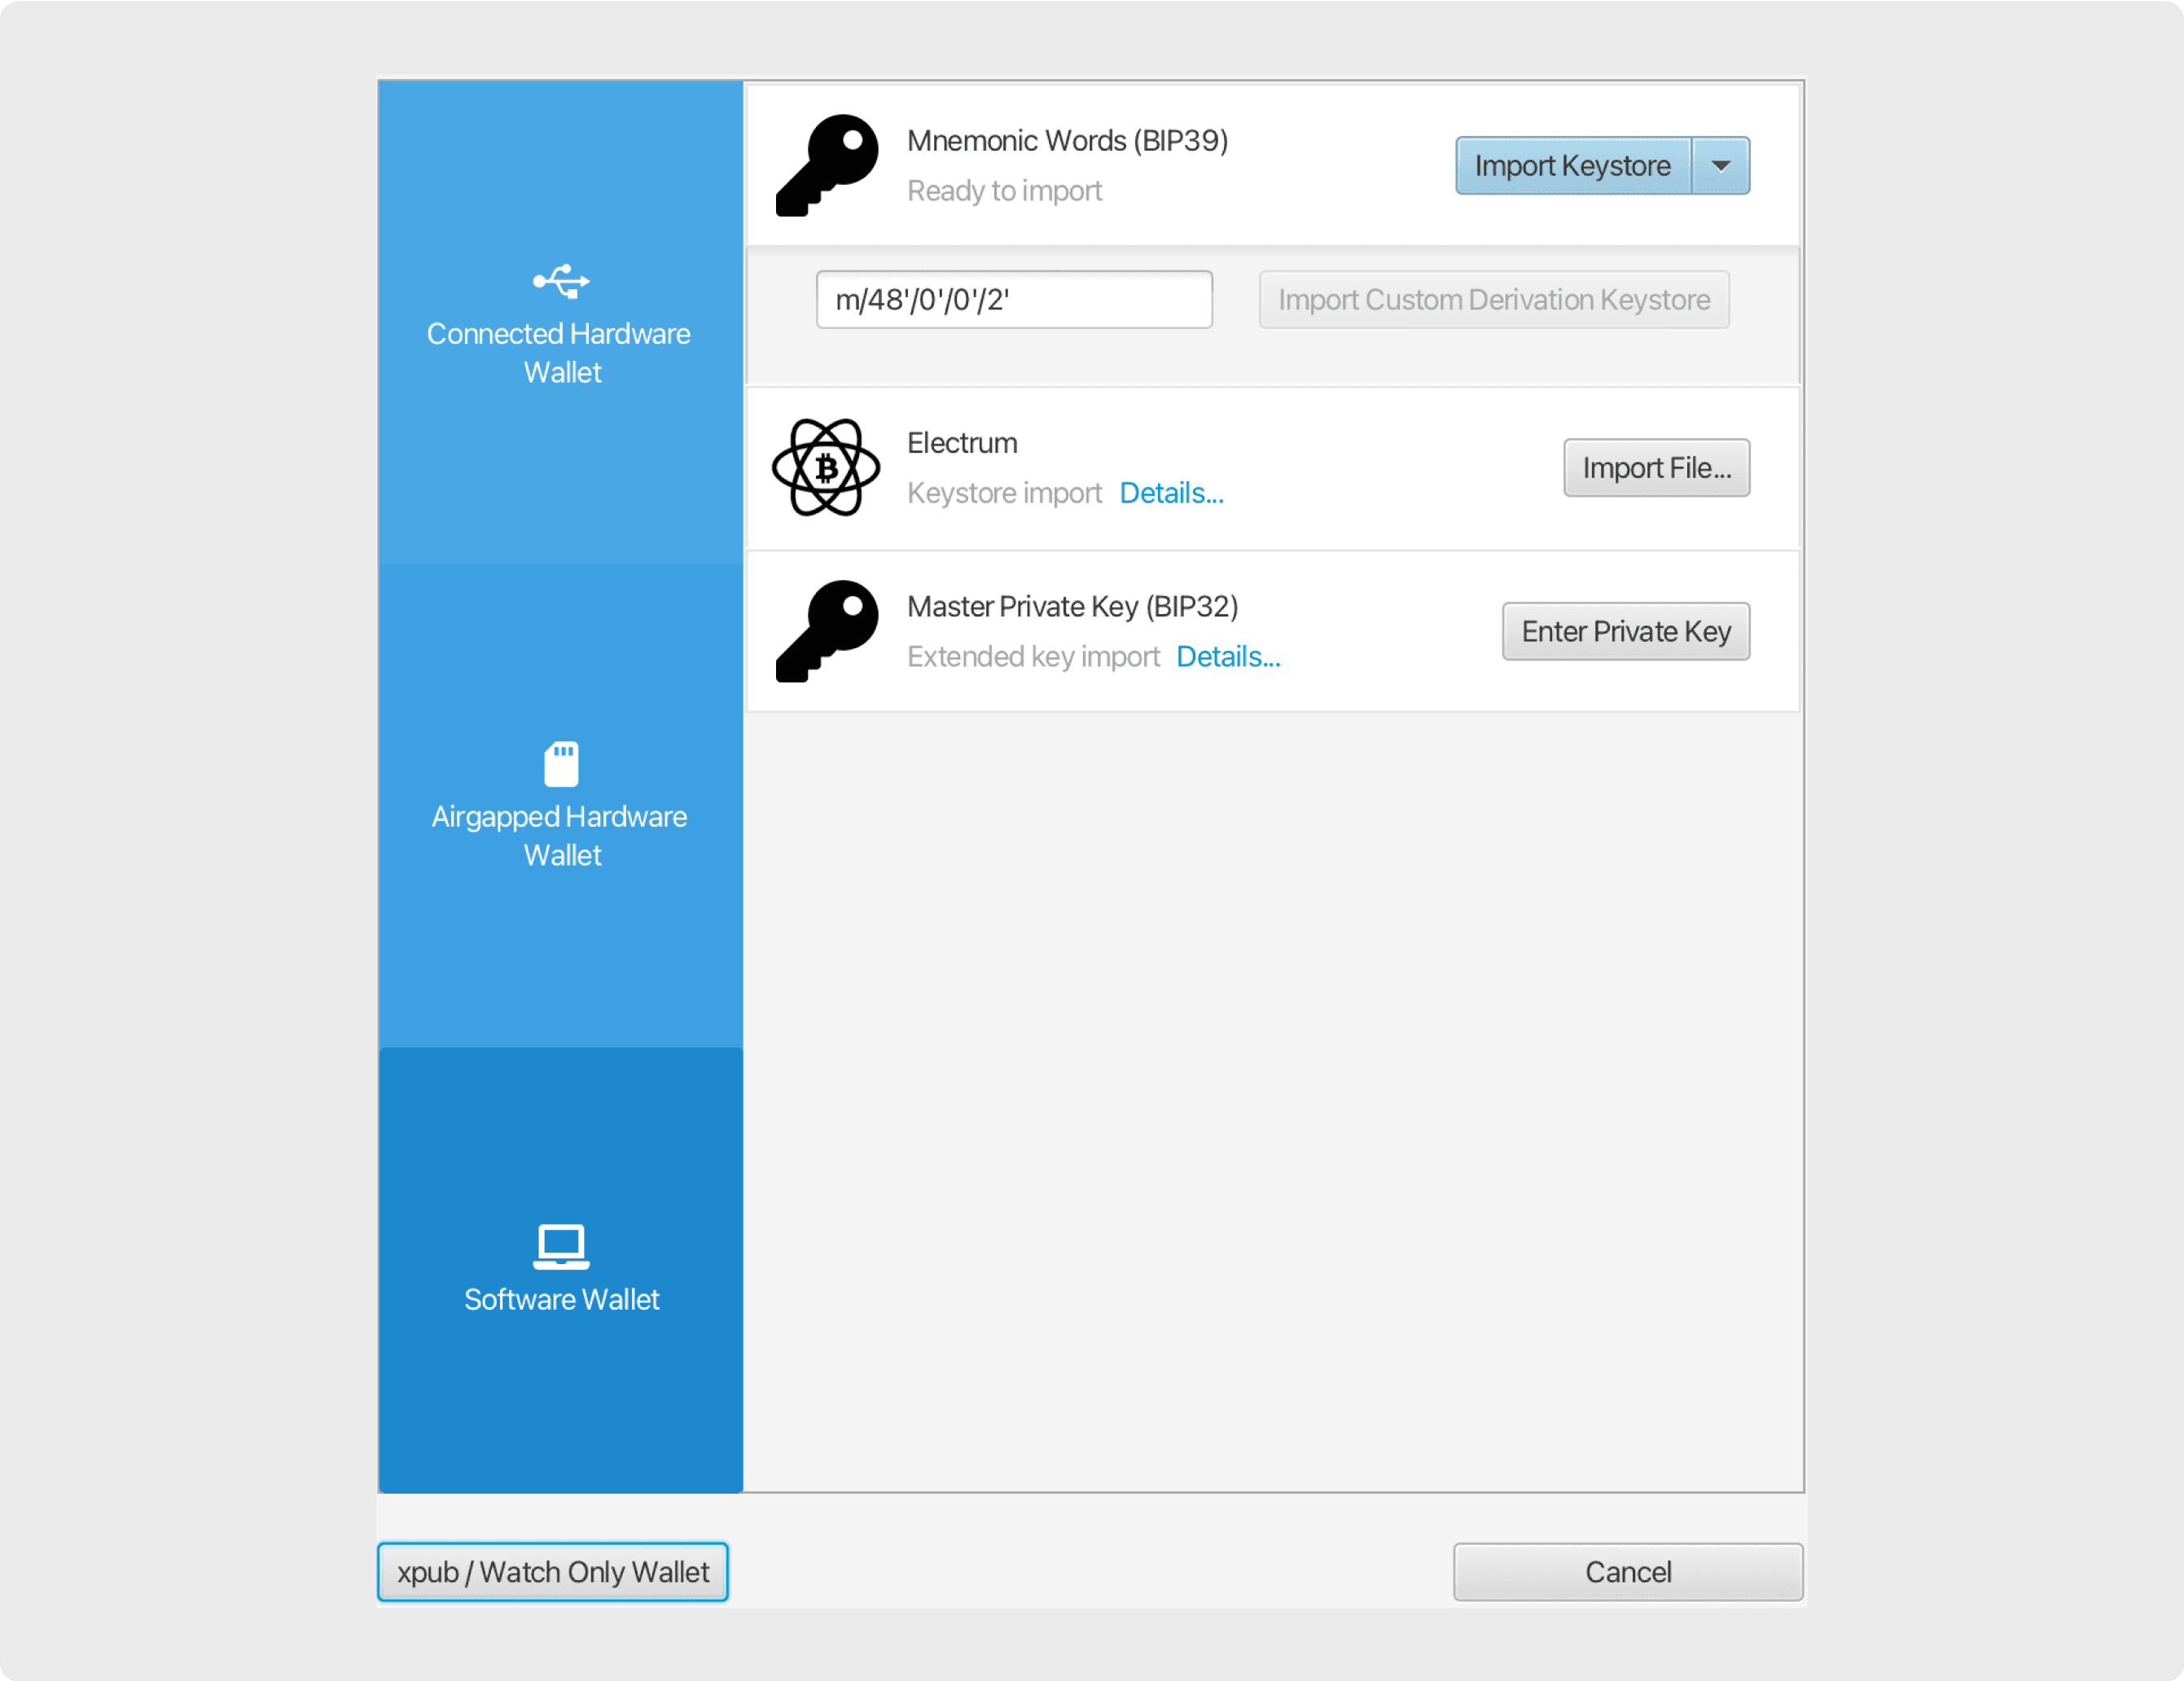
Also take note of the master fingerprint of the key.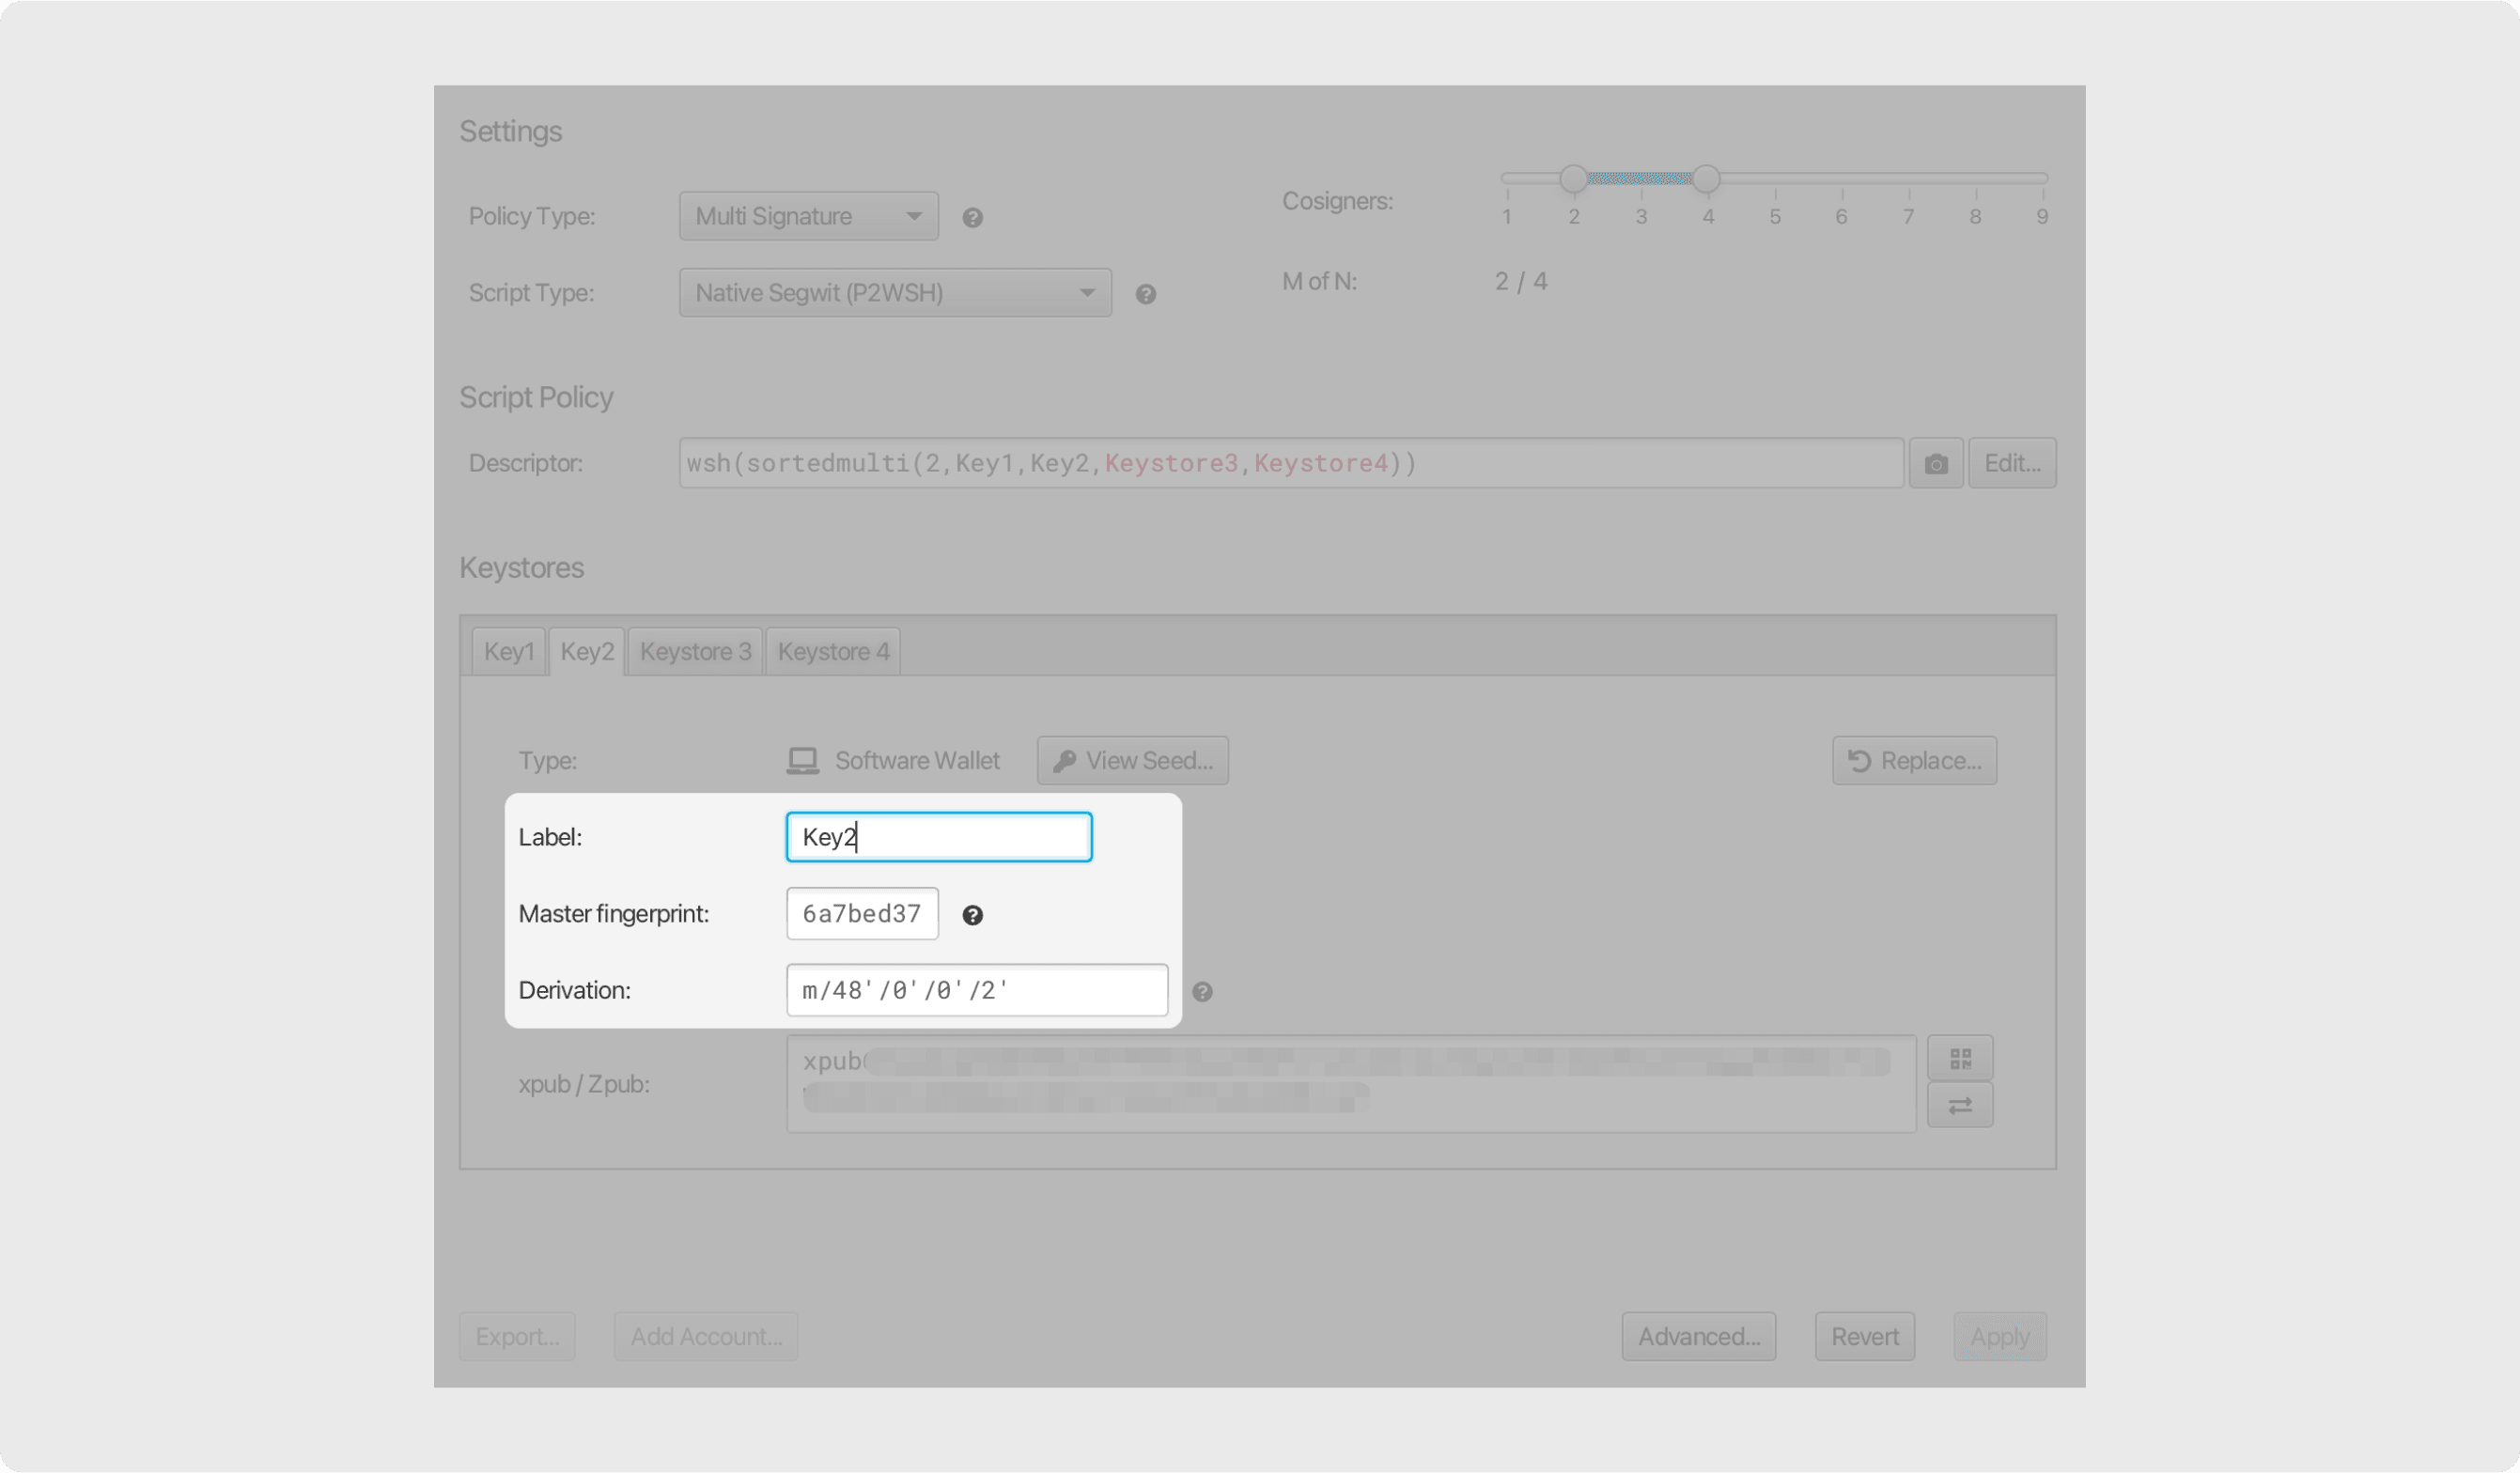
Step 4
Next, you will fill in the other keys in the wallet by putting in their extended public keys (XPUBs).
To get the XPUBs, open the wallet configuration file. Note the fingerprints of the keys you already imported. In this example, keys with fingerprints 7b71b9cb and 6a7bed37 (highlighted red) were already imported.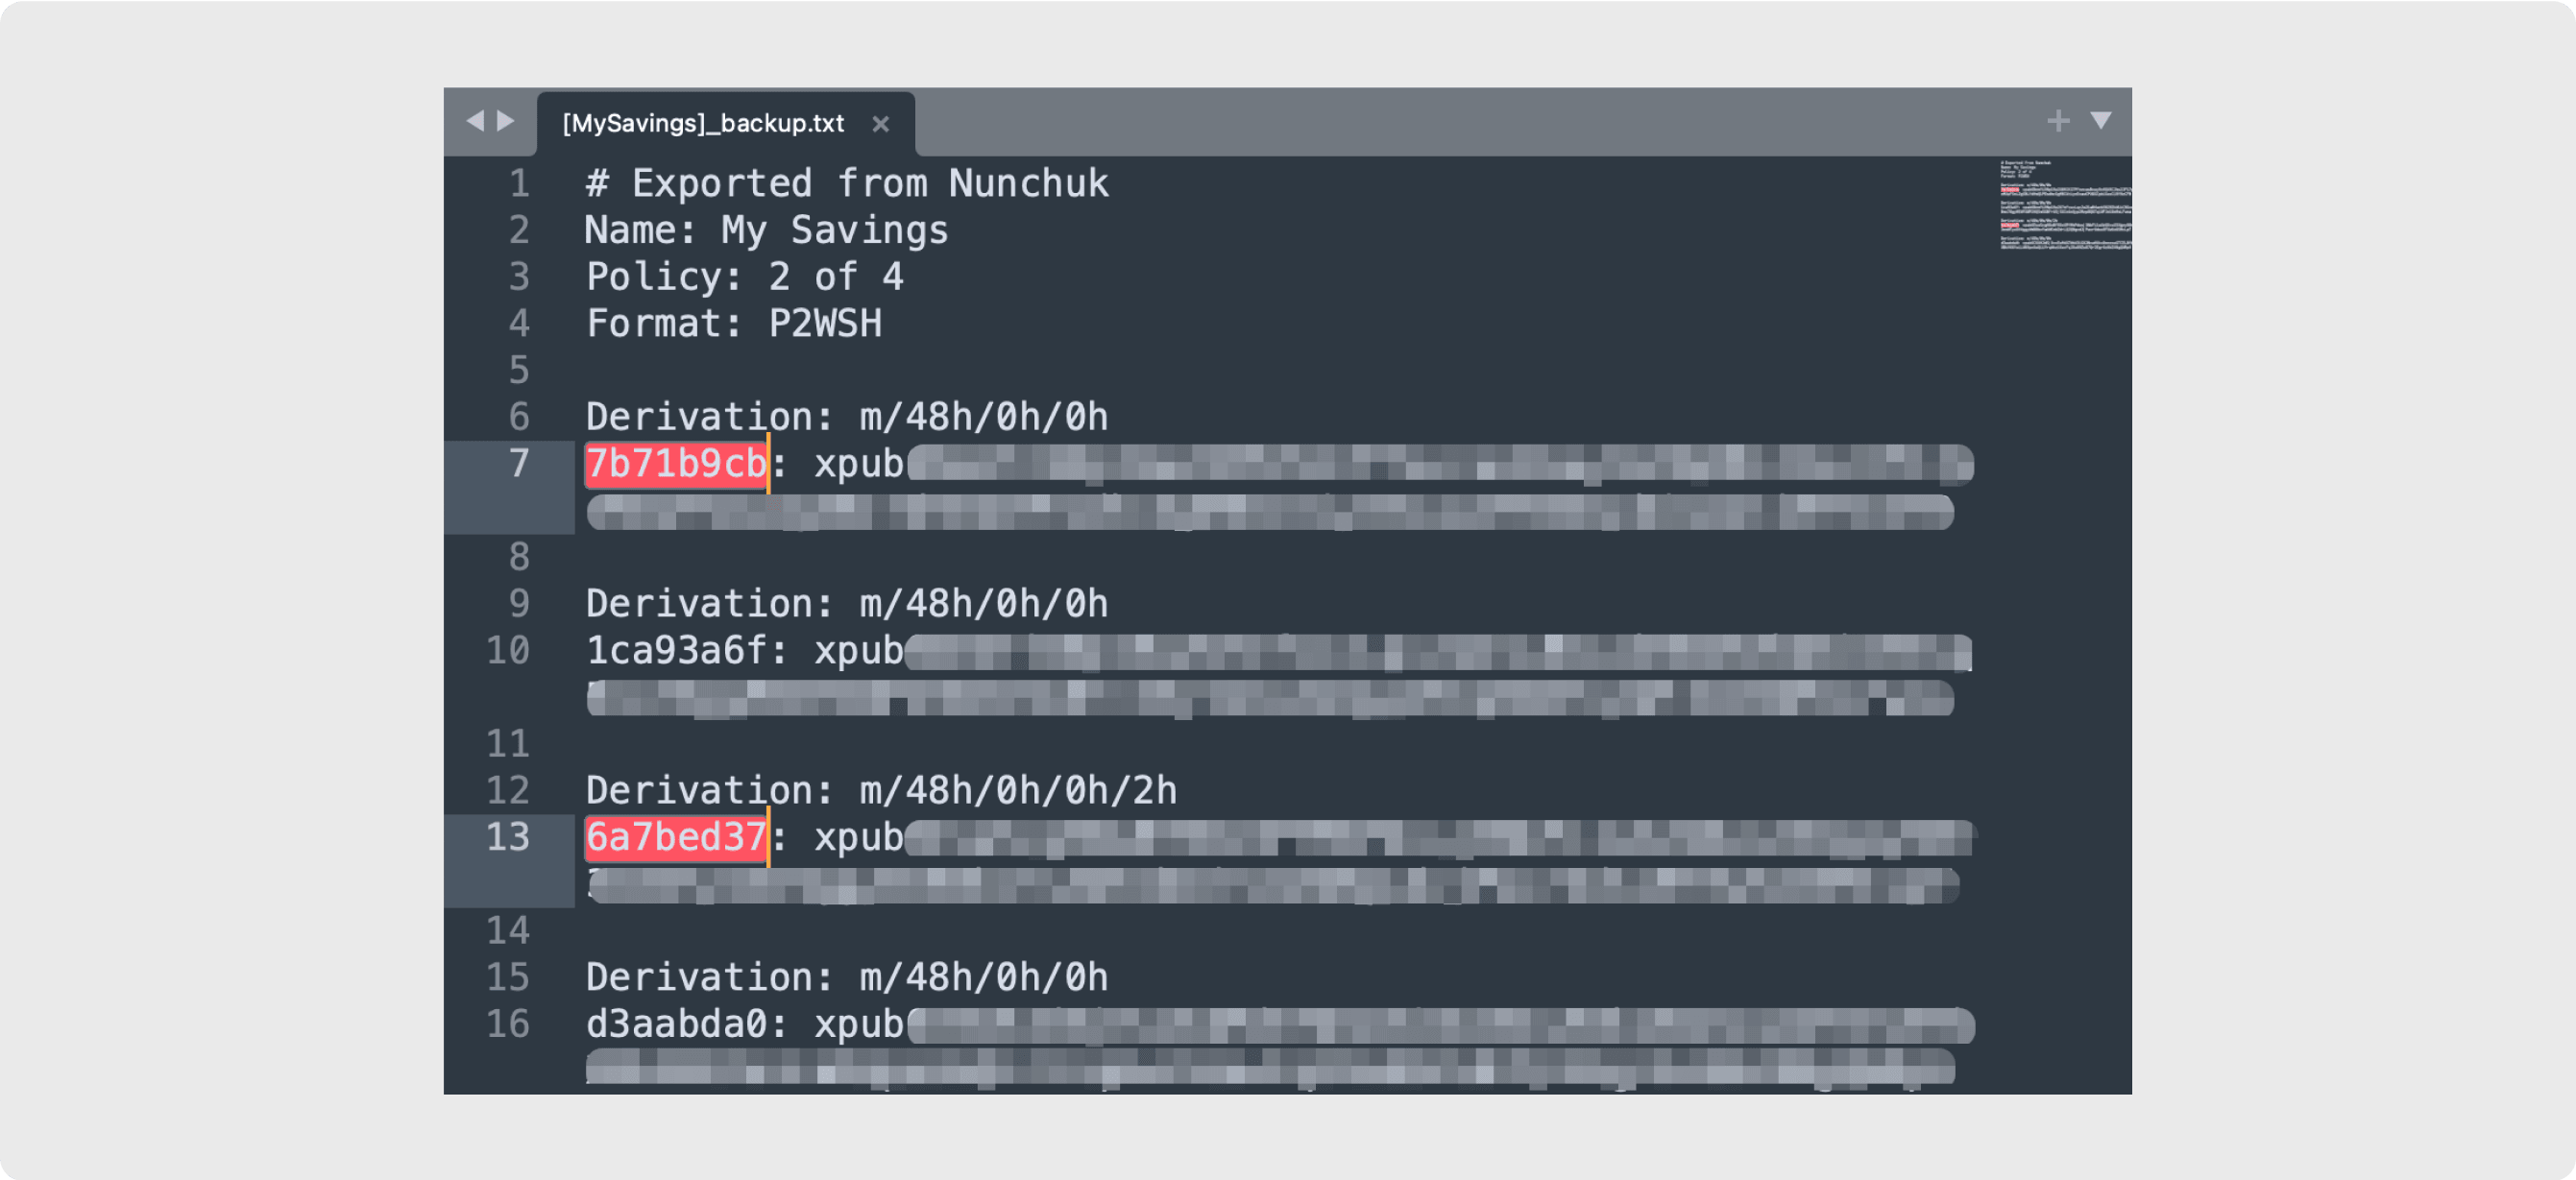
Now we will add the rest of the keys (highlighted green) as XPUBs in Sparrow.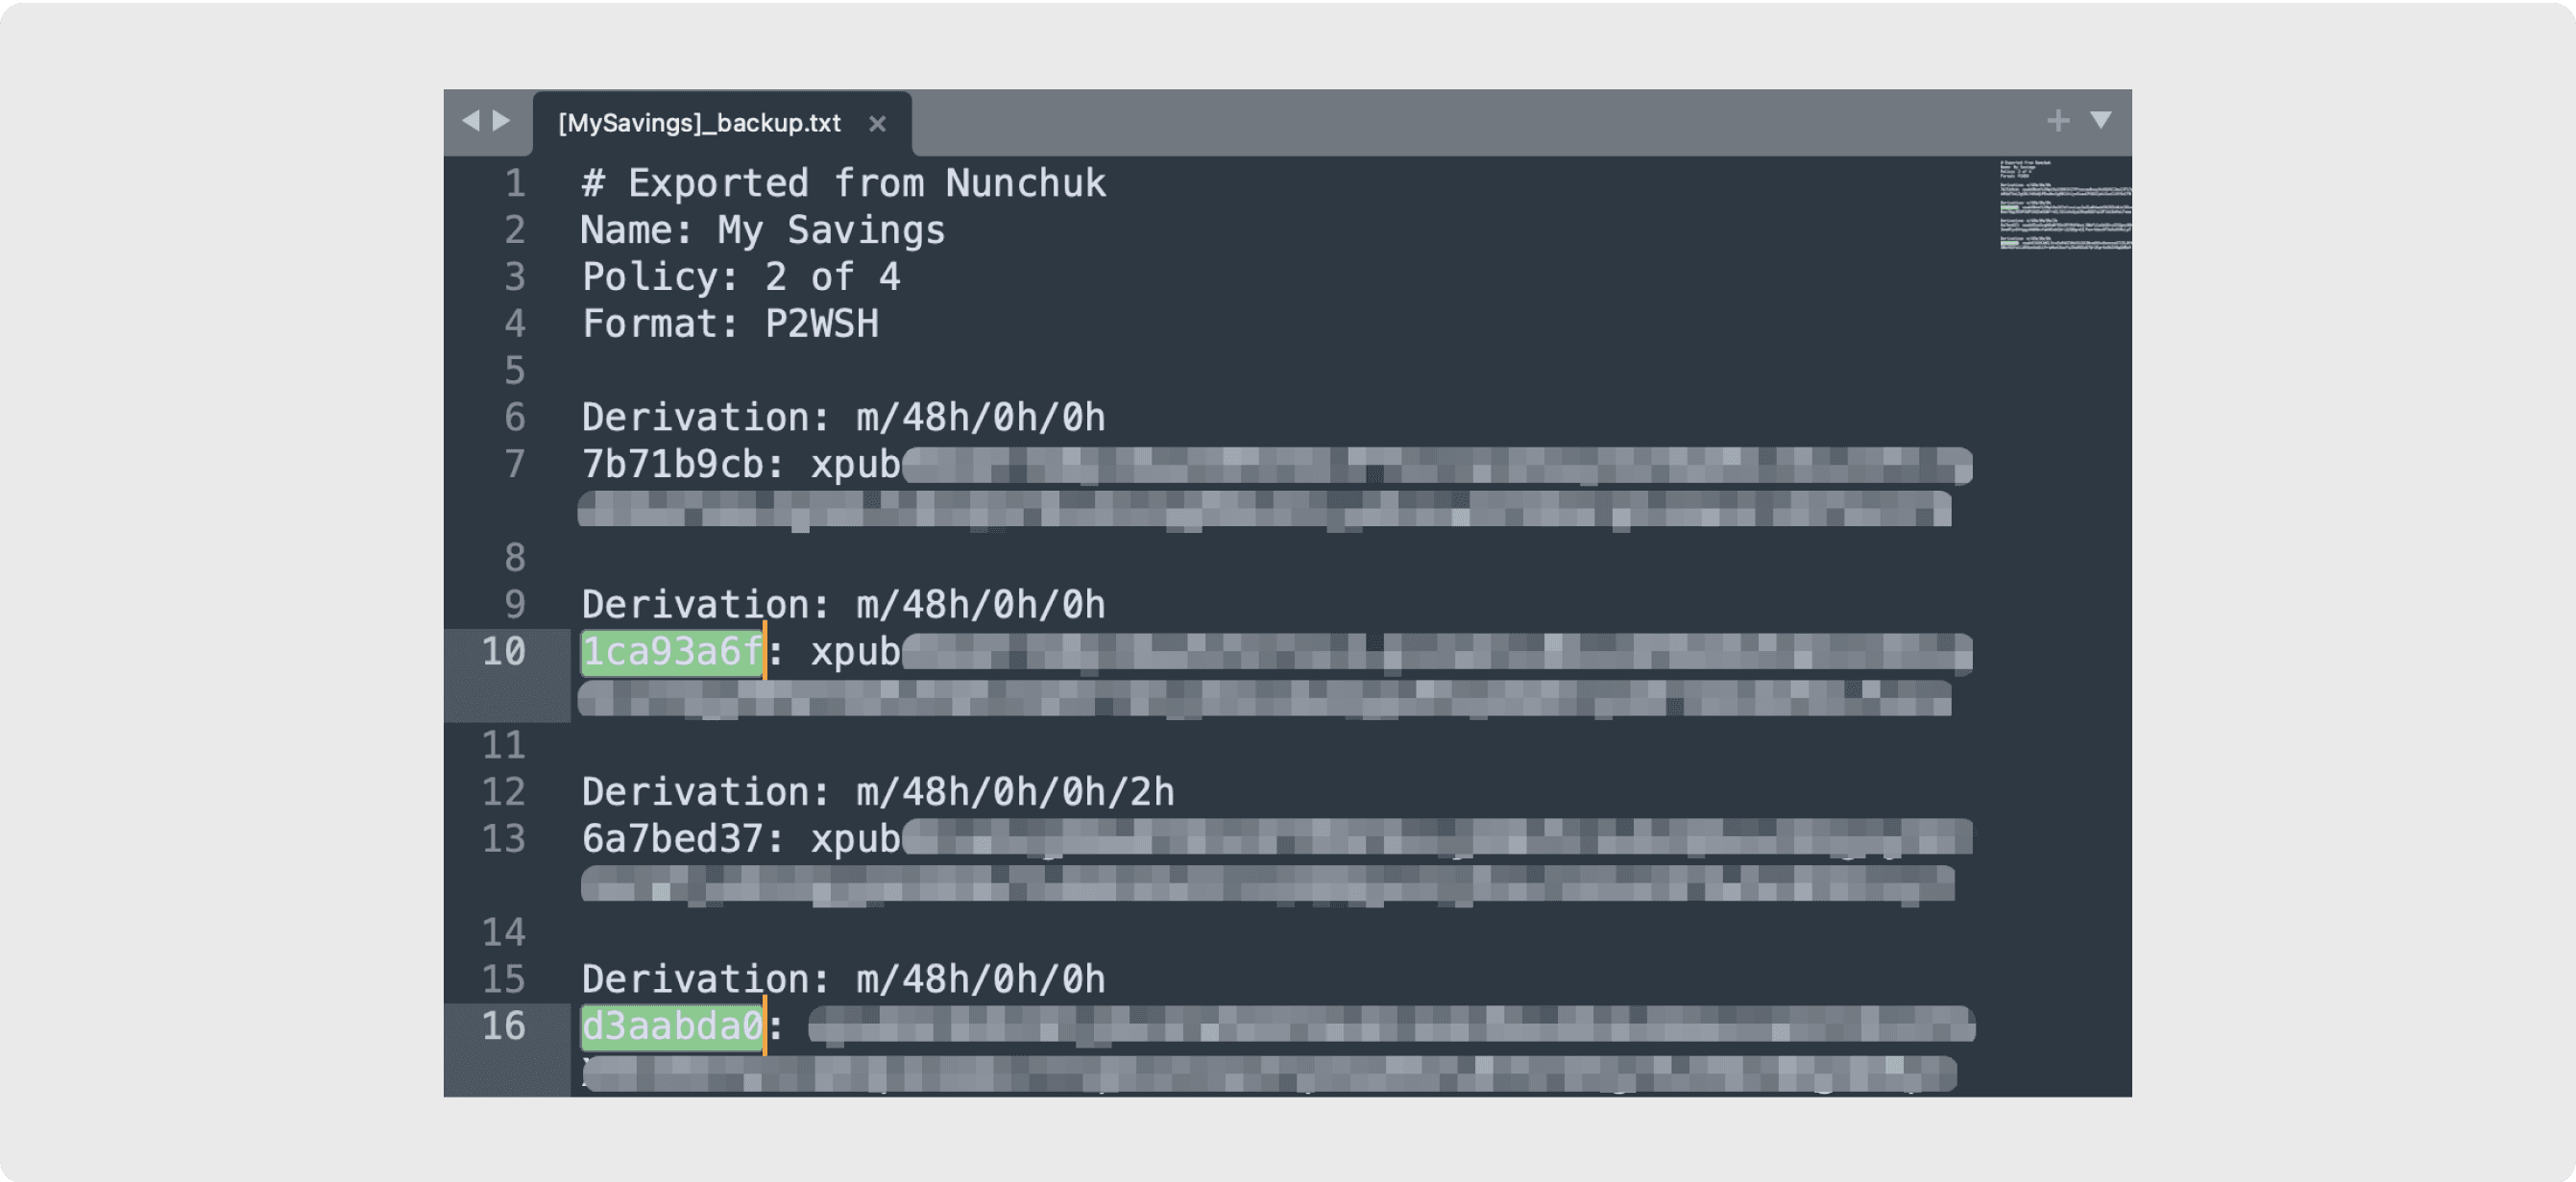
Under another unused Keystore tab, select “xPub / Watch Only Wallet”.
Fill in the master fingerprint, derivation path and XPUB for one of the unassigned keys.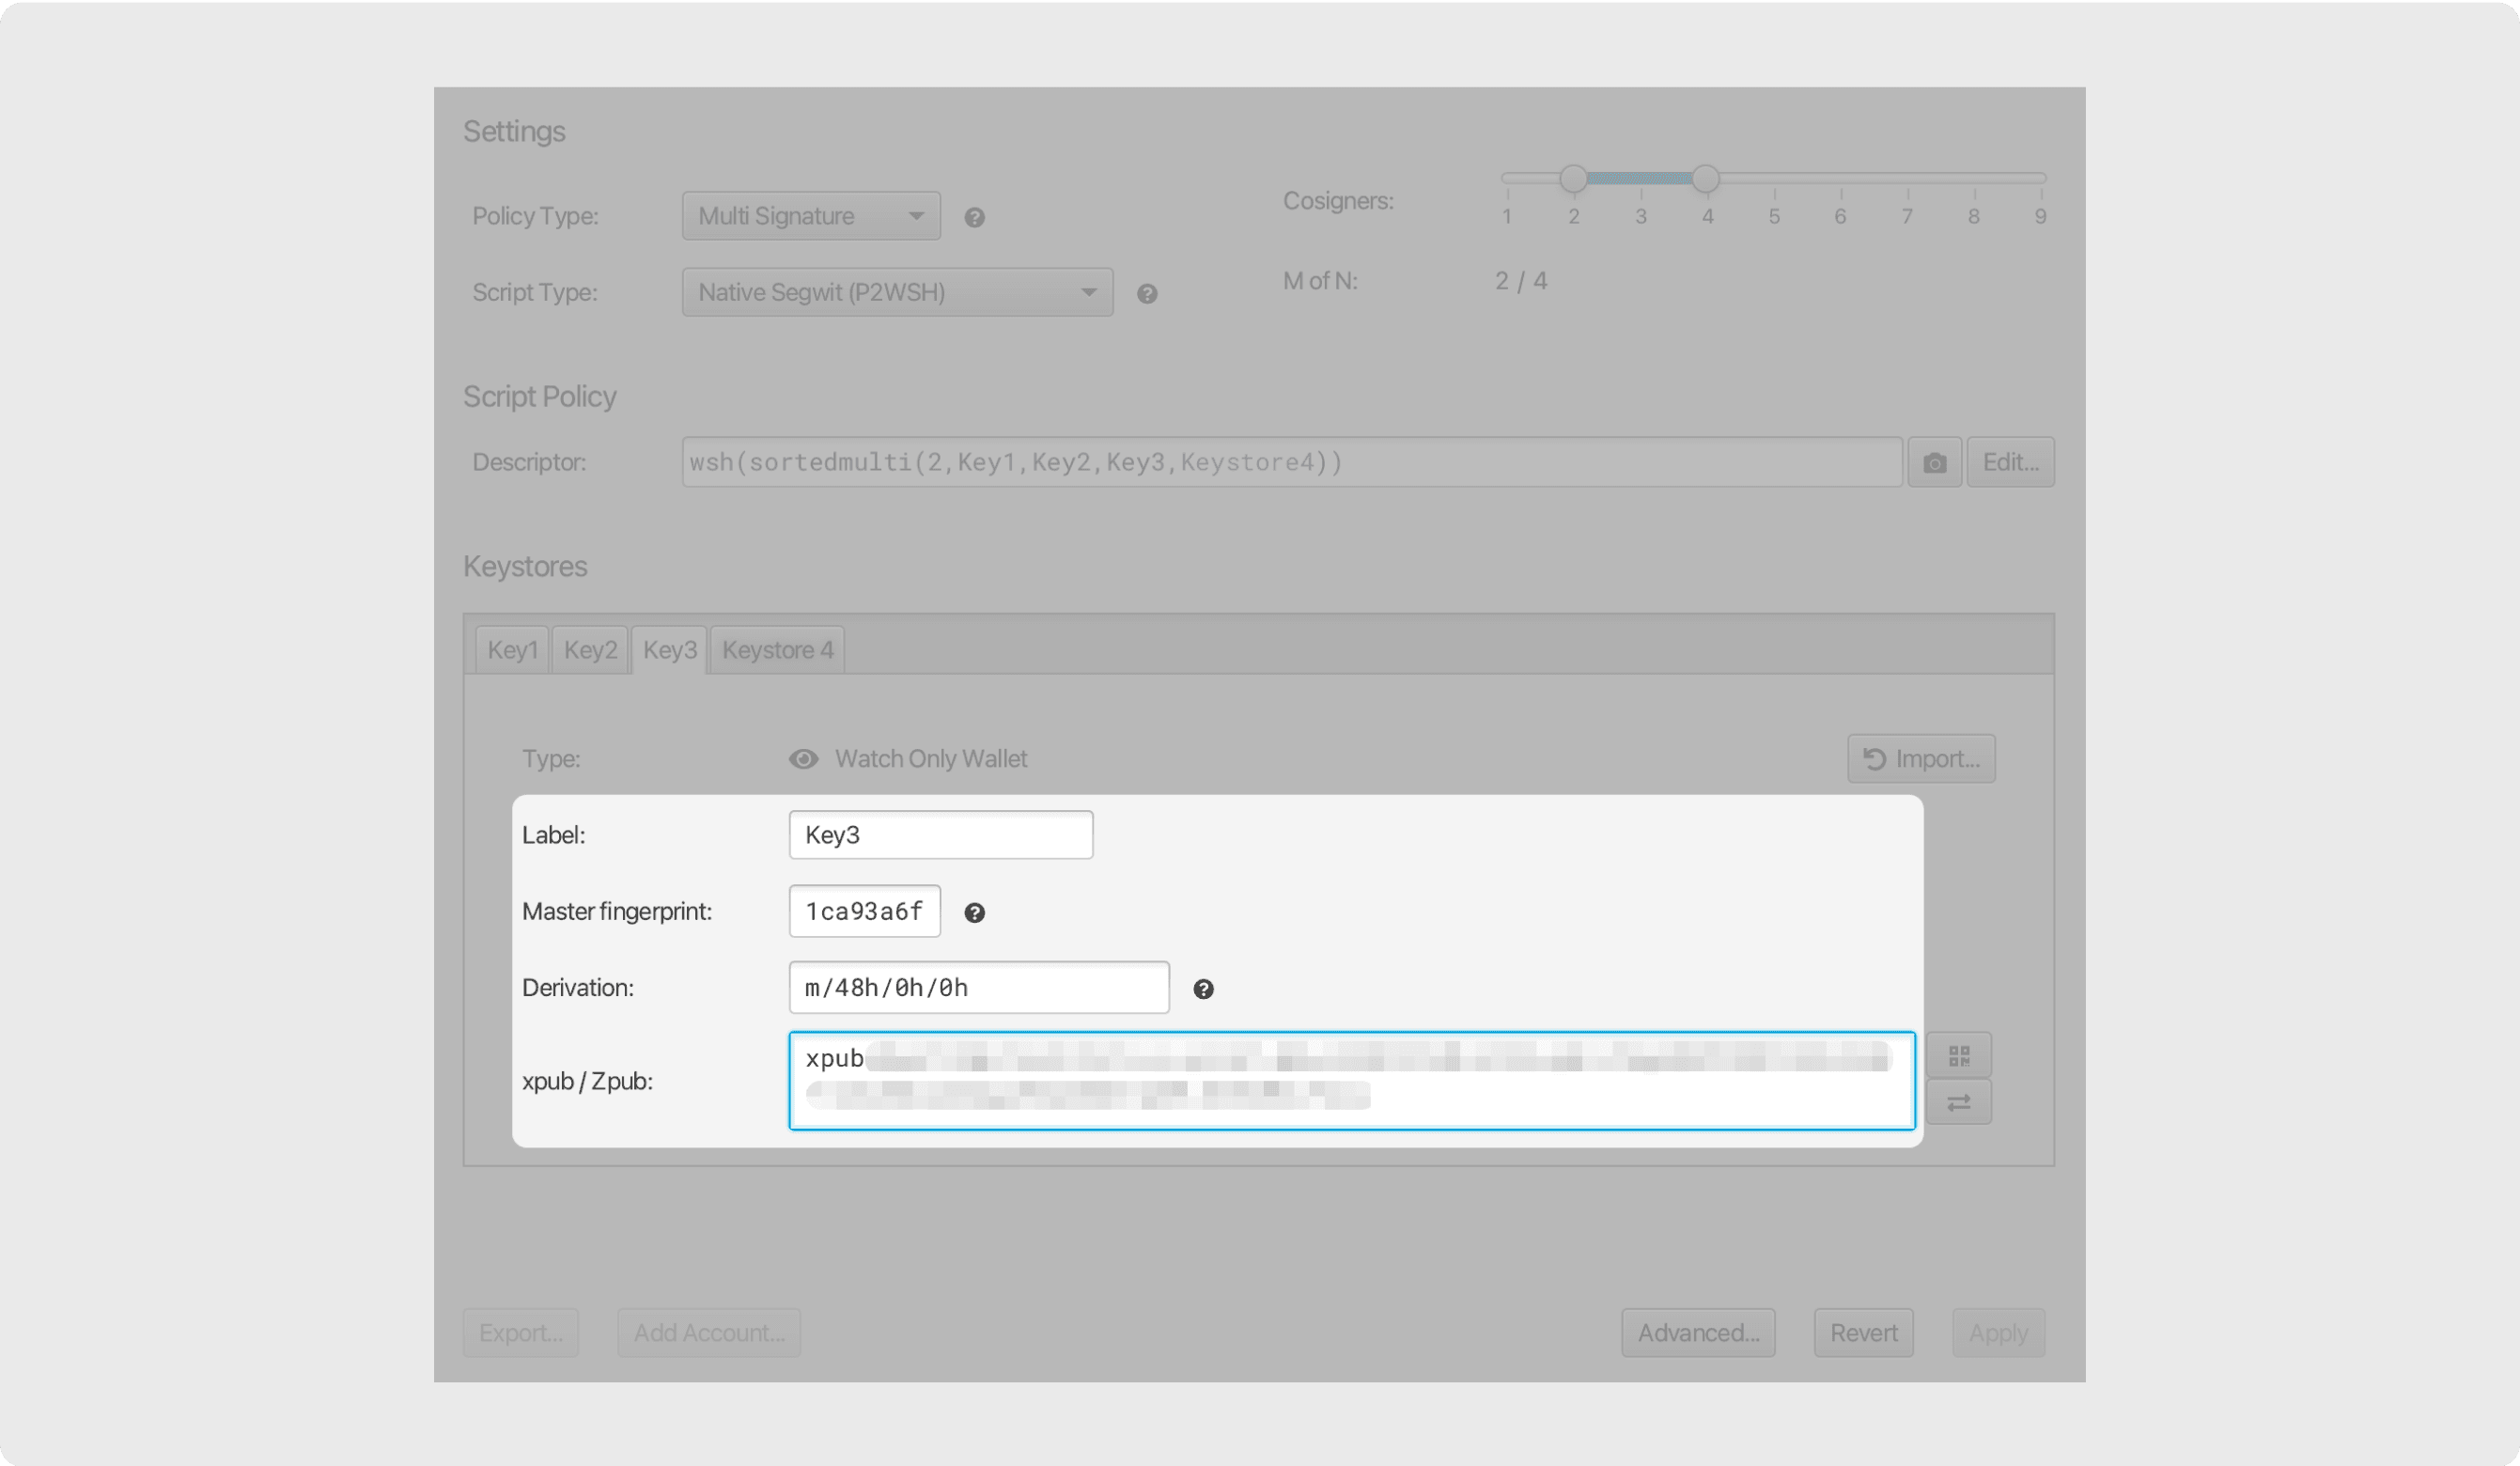
Repeat the above to add all the unassigned keys.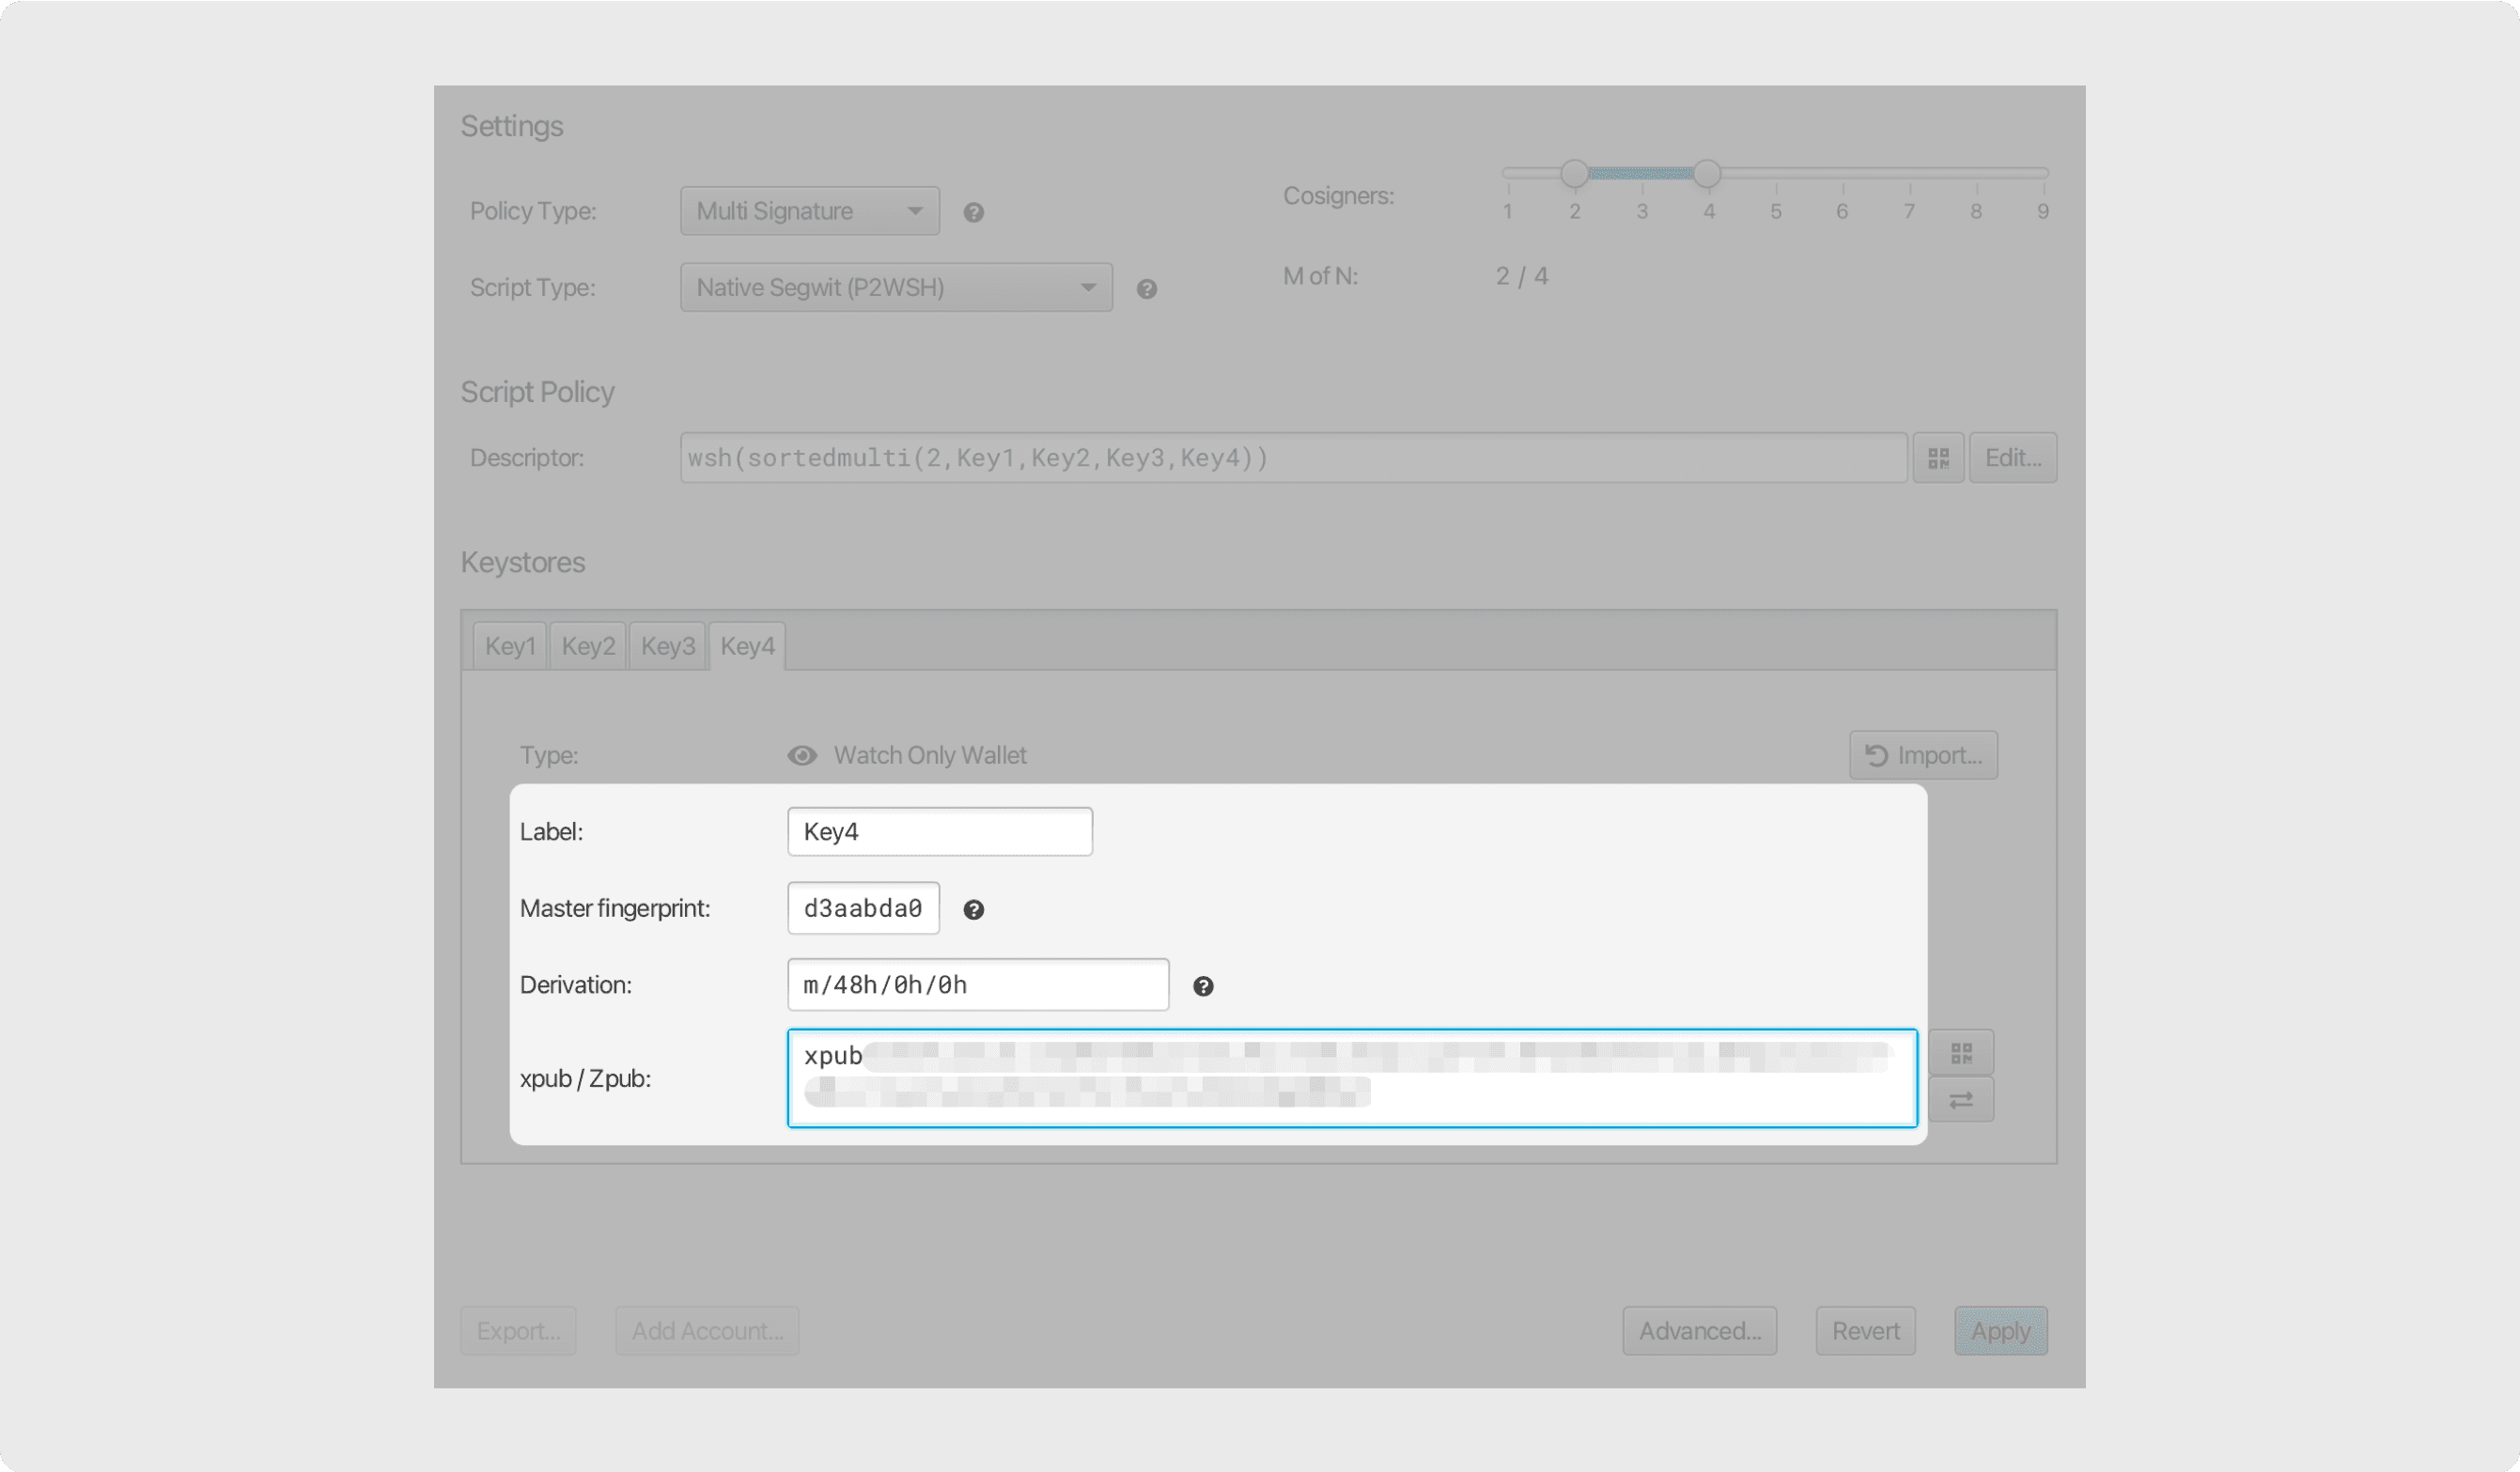
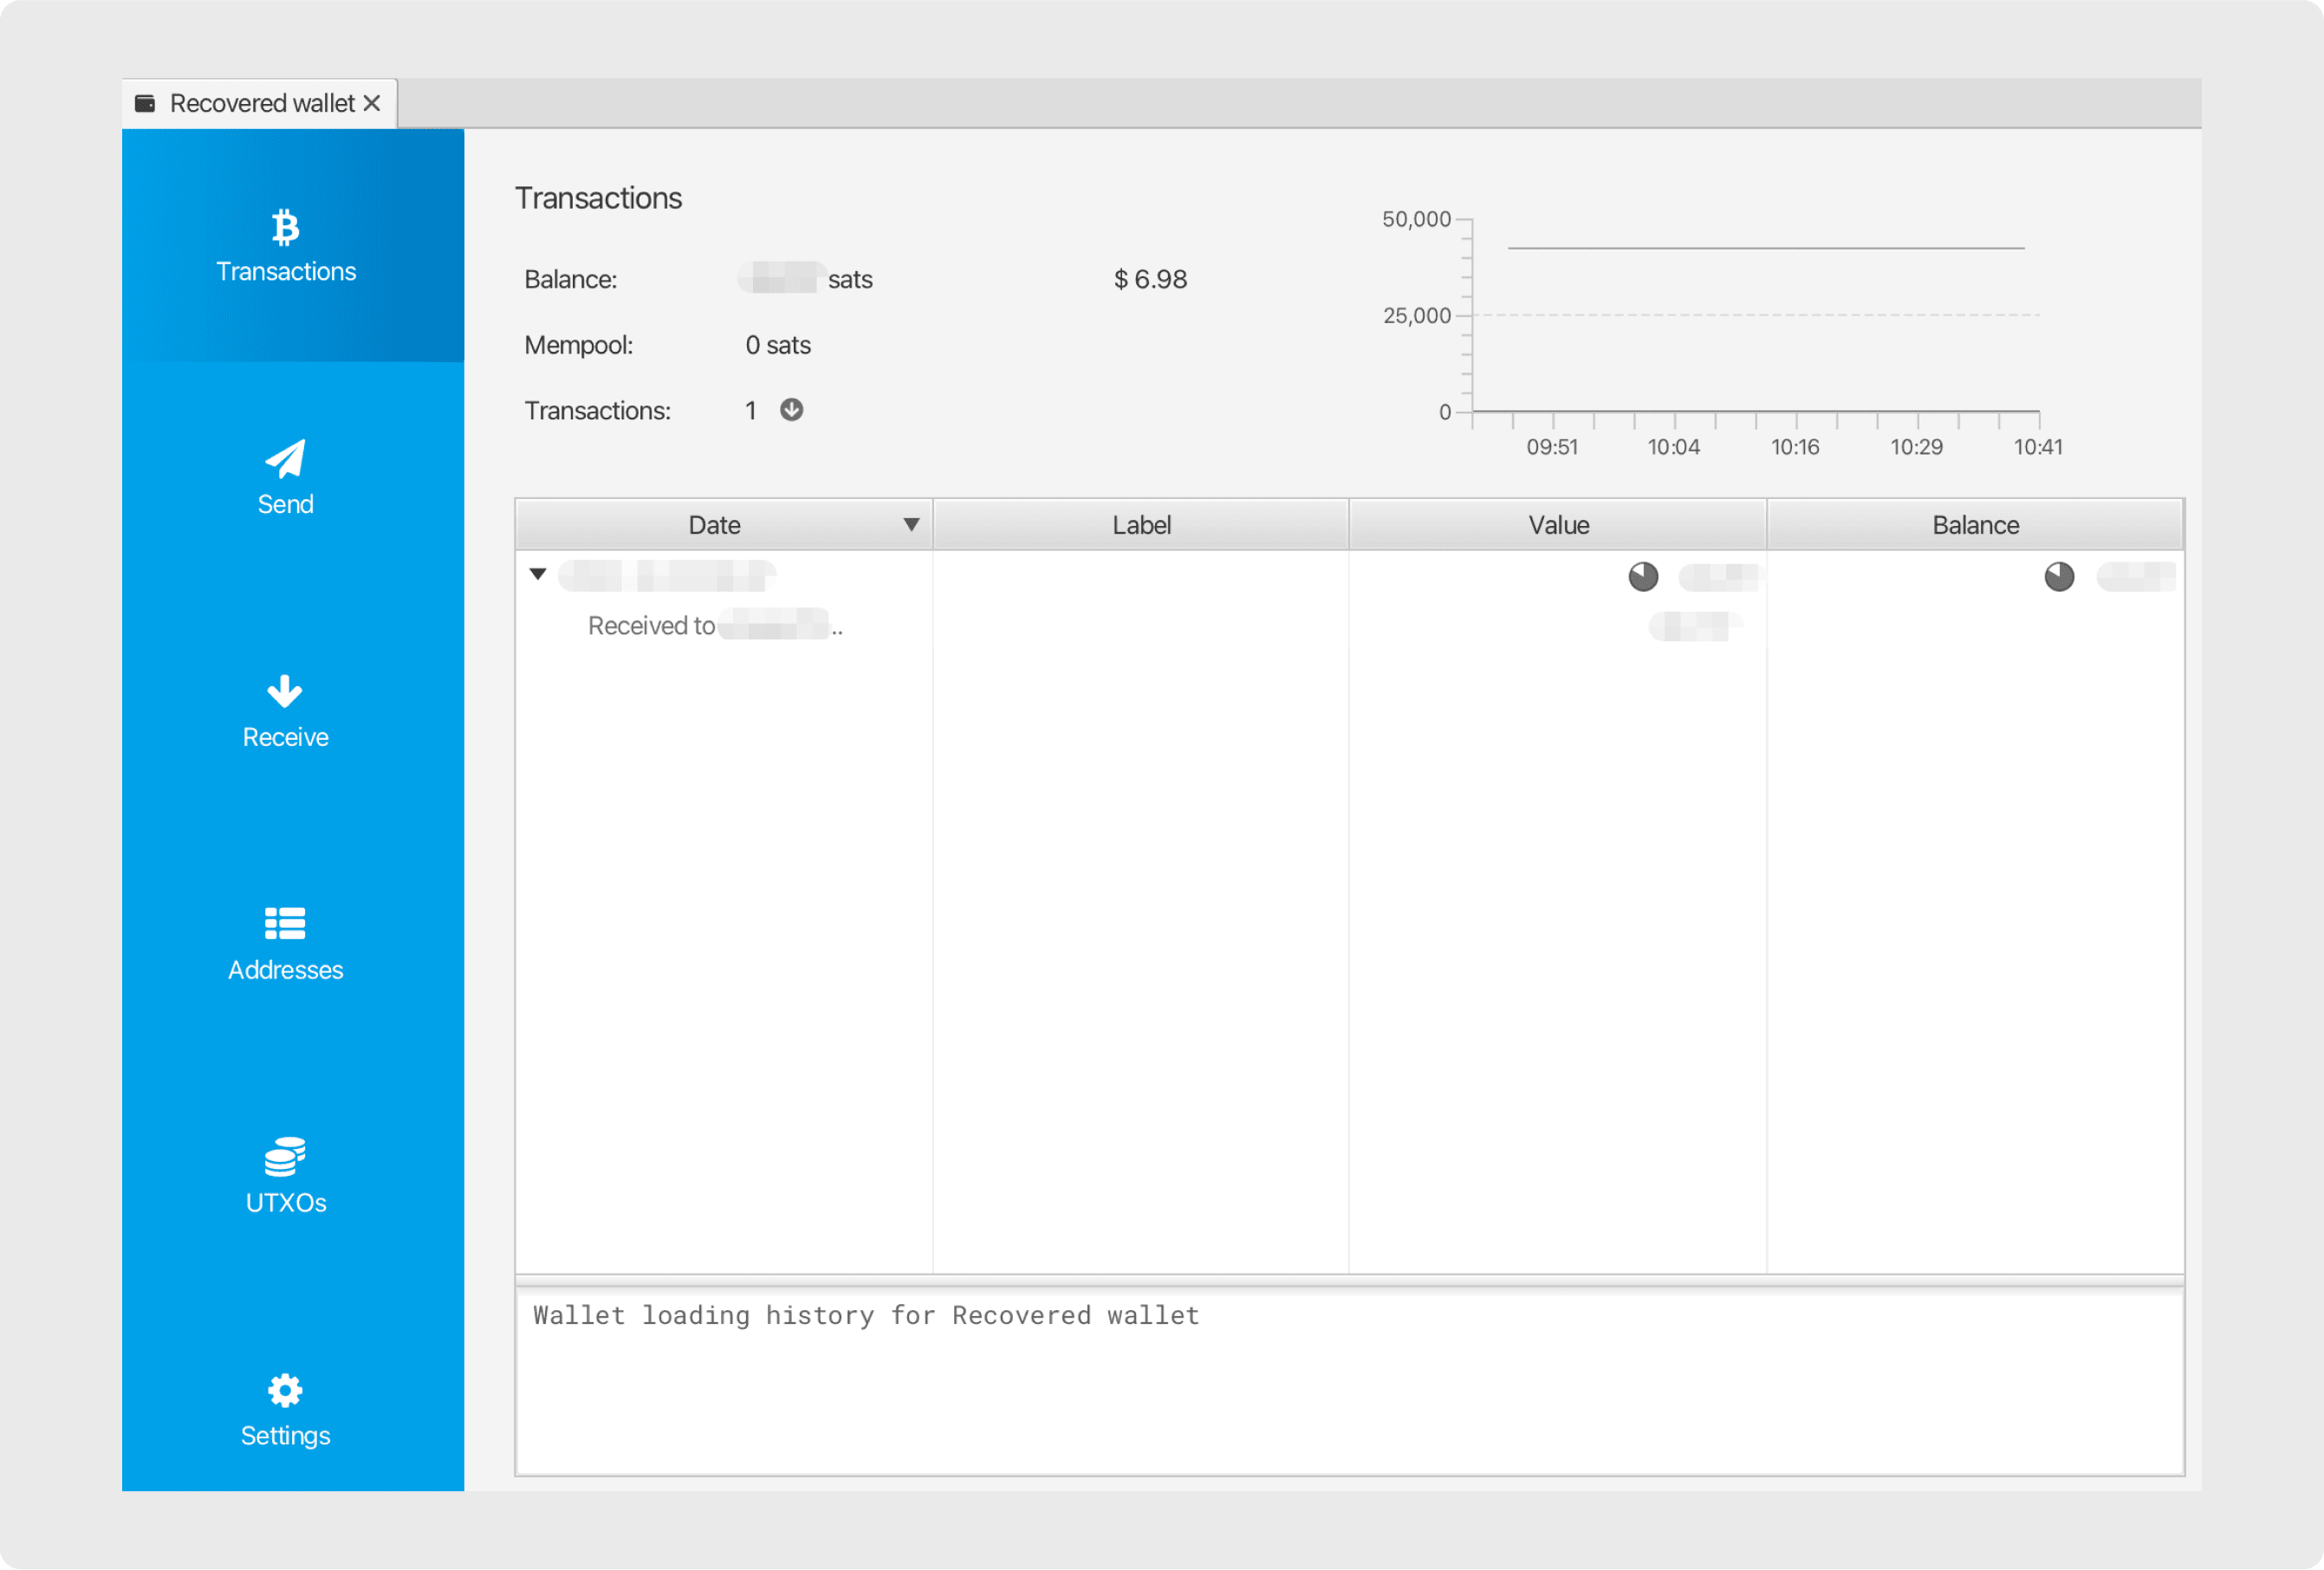
Once you have imported all the keys, confirm that you have recovered the correct wallet by navigating to the Transactions tab. You should be able to see your wallet history and balance.
If you don’t see your old transactions, it could be due to a number of reasons:
- Your Sparrow server is offline. Change to a different server if you have connection issues.
- One or more keys were imported incorrectly. Review the previous steps. Pay special attention to things like passphrases and derivation paths.
Step 5
Now that you've gotten the old wallet back, let’s create a transaction that sweeps the balance from this wallet. Navigate to the Send tab, fill in the address you want to withdraw bitcoin to, optionally adjust the fee settings, and click “Create Transaction”.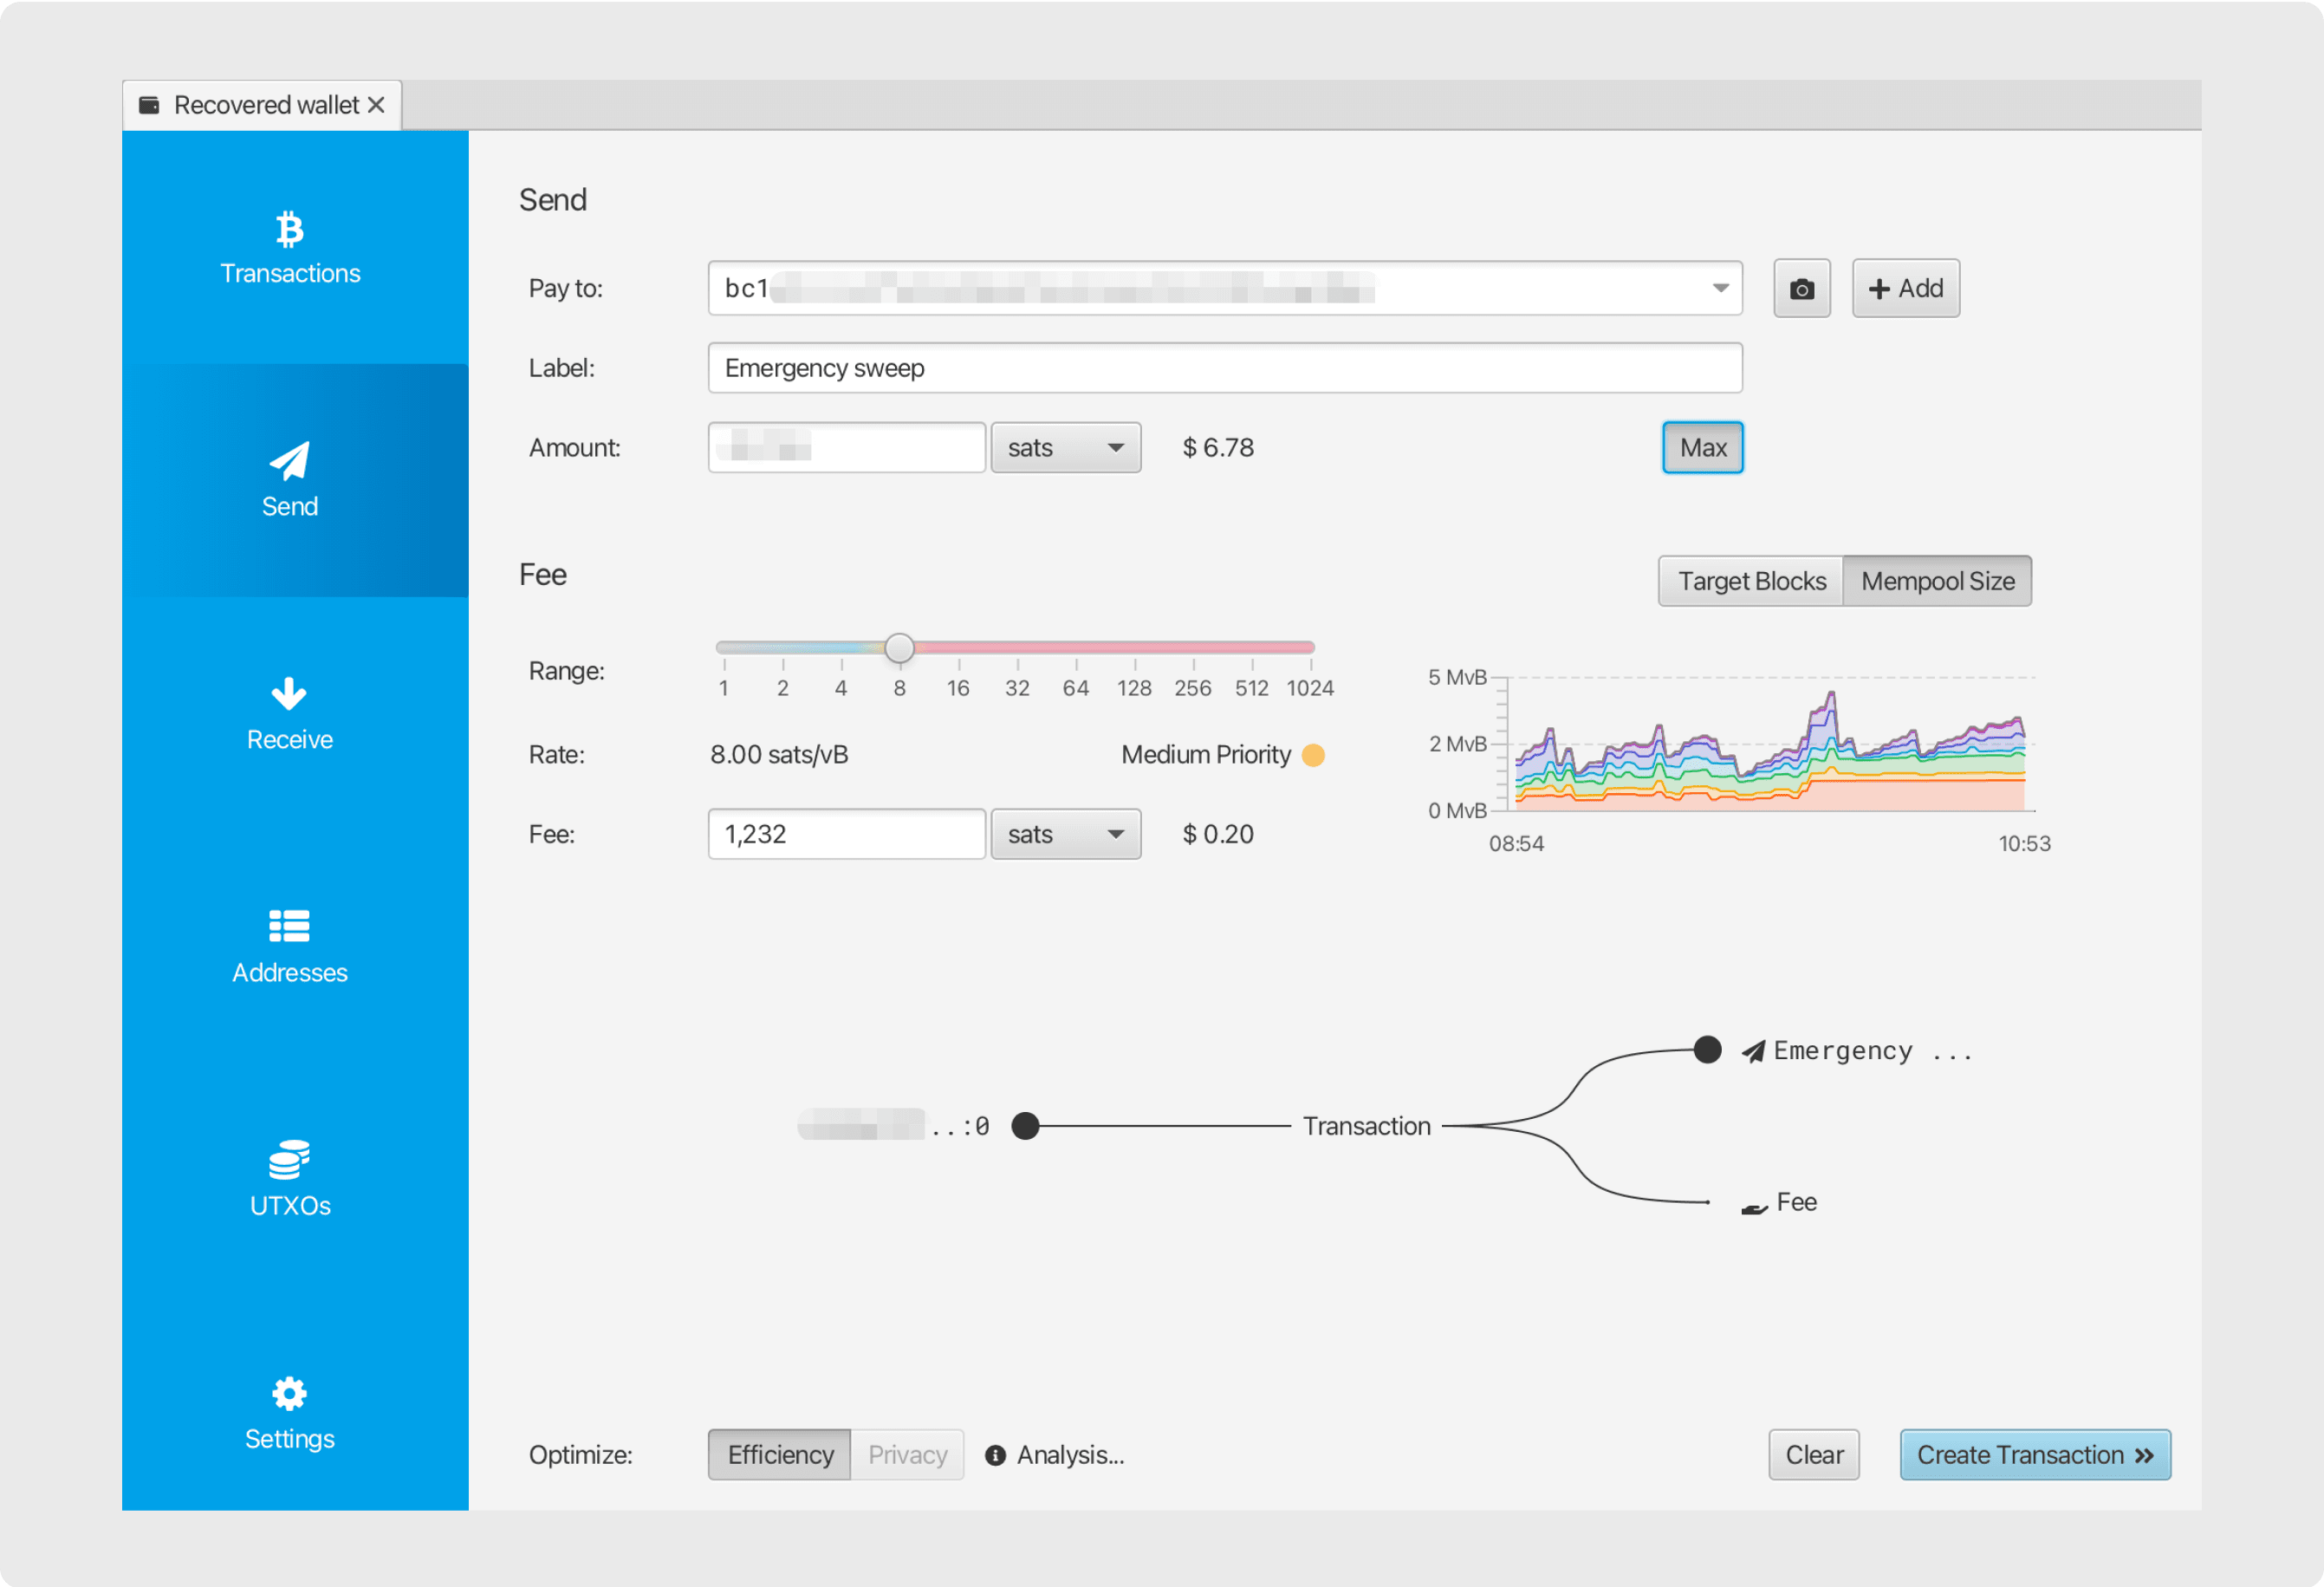
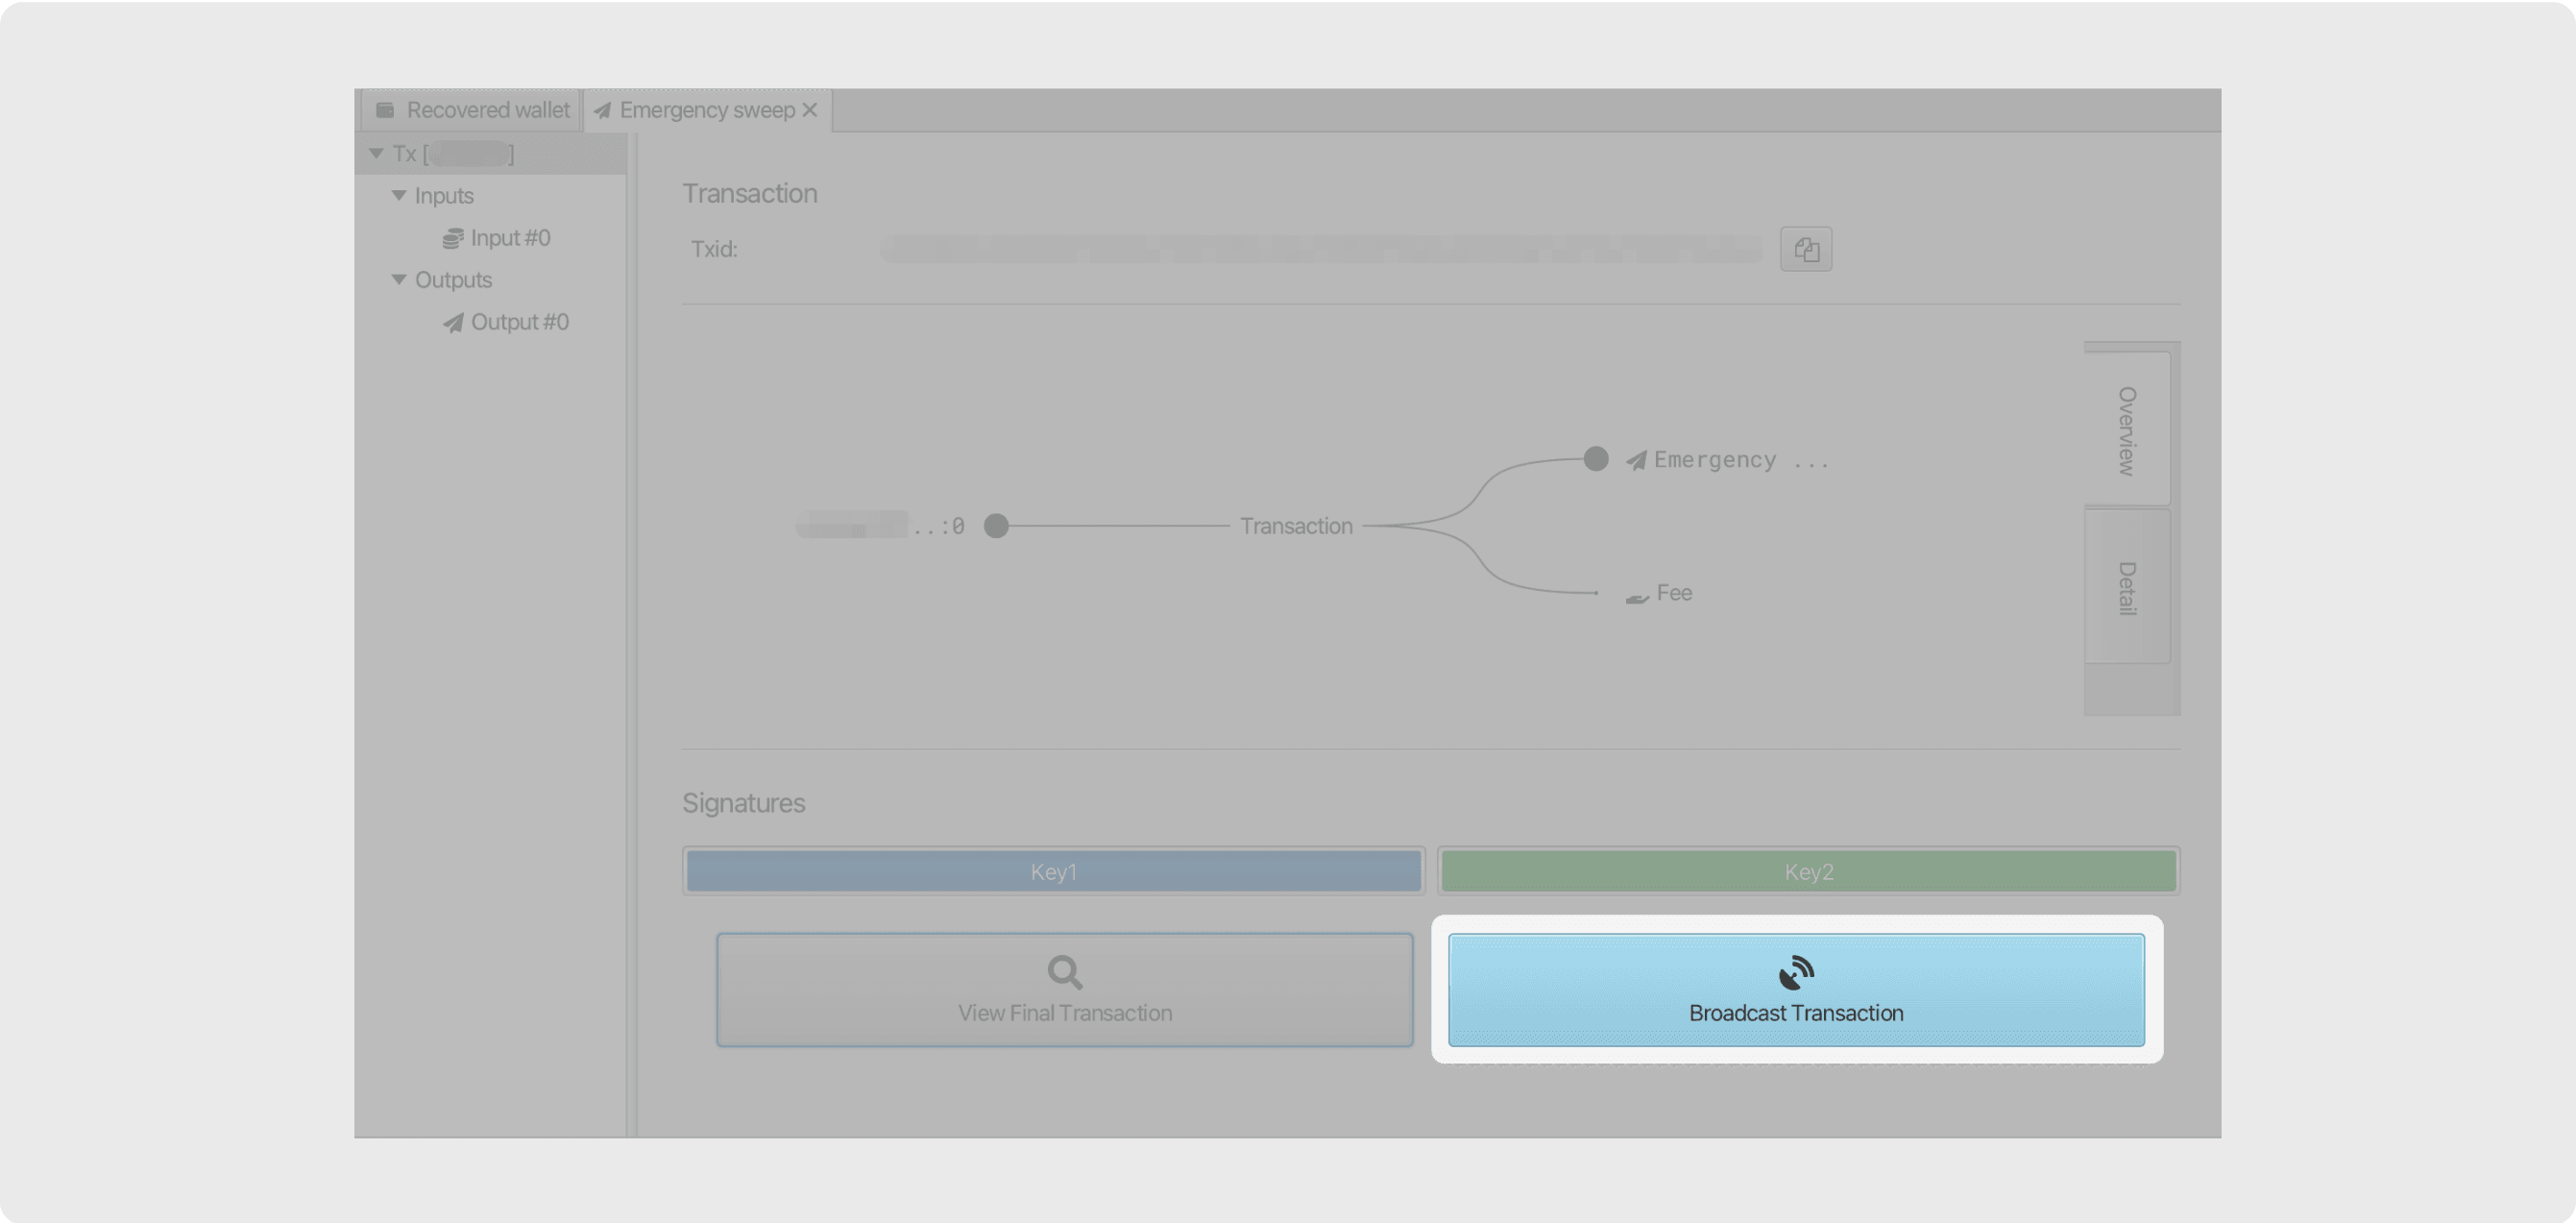
Sign and broadcast your transaction.
Congratulations, you have successfully recovered and swept a Nunchuk wallet using Sparrow!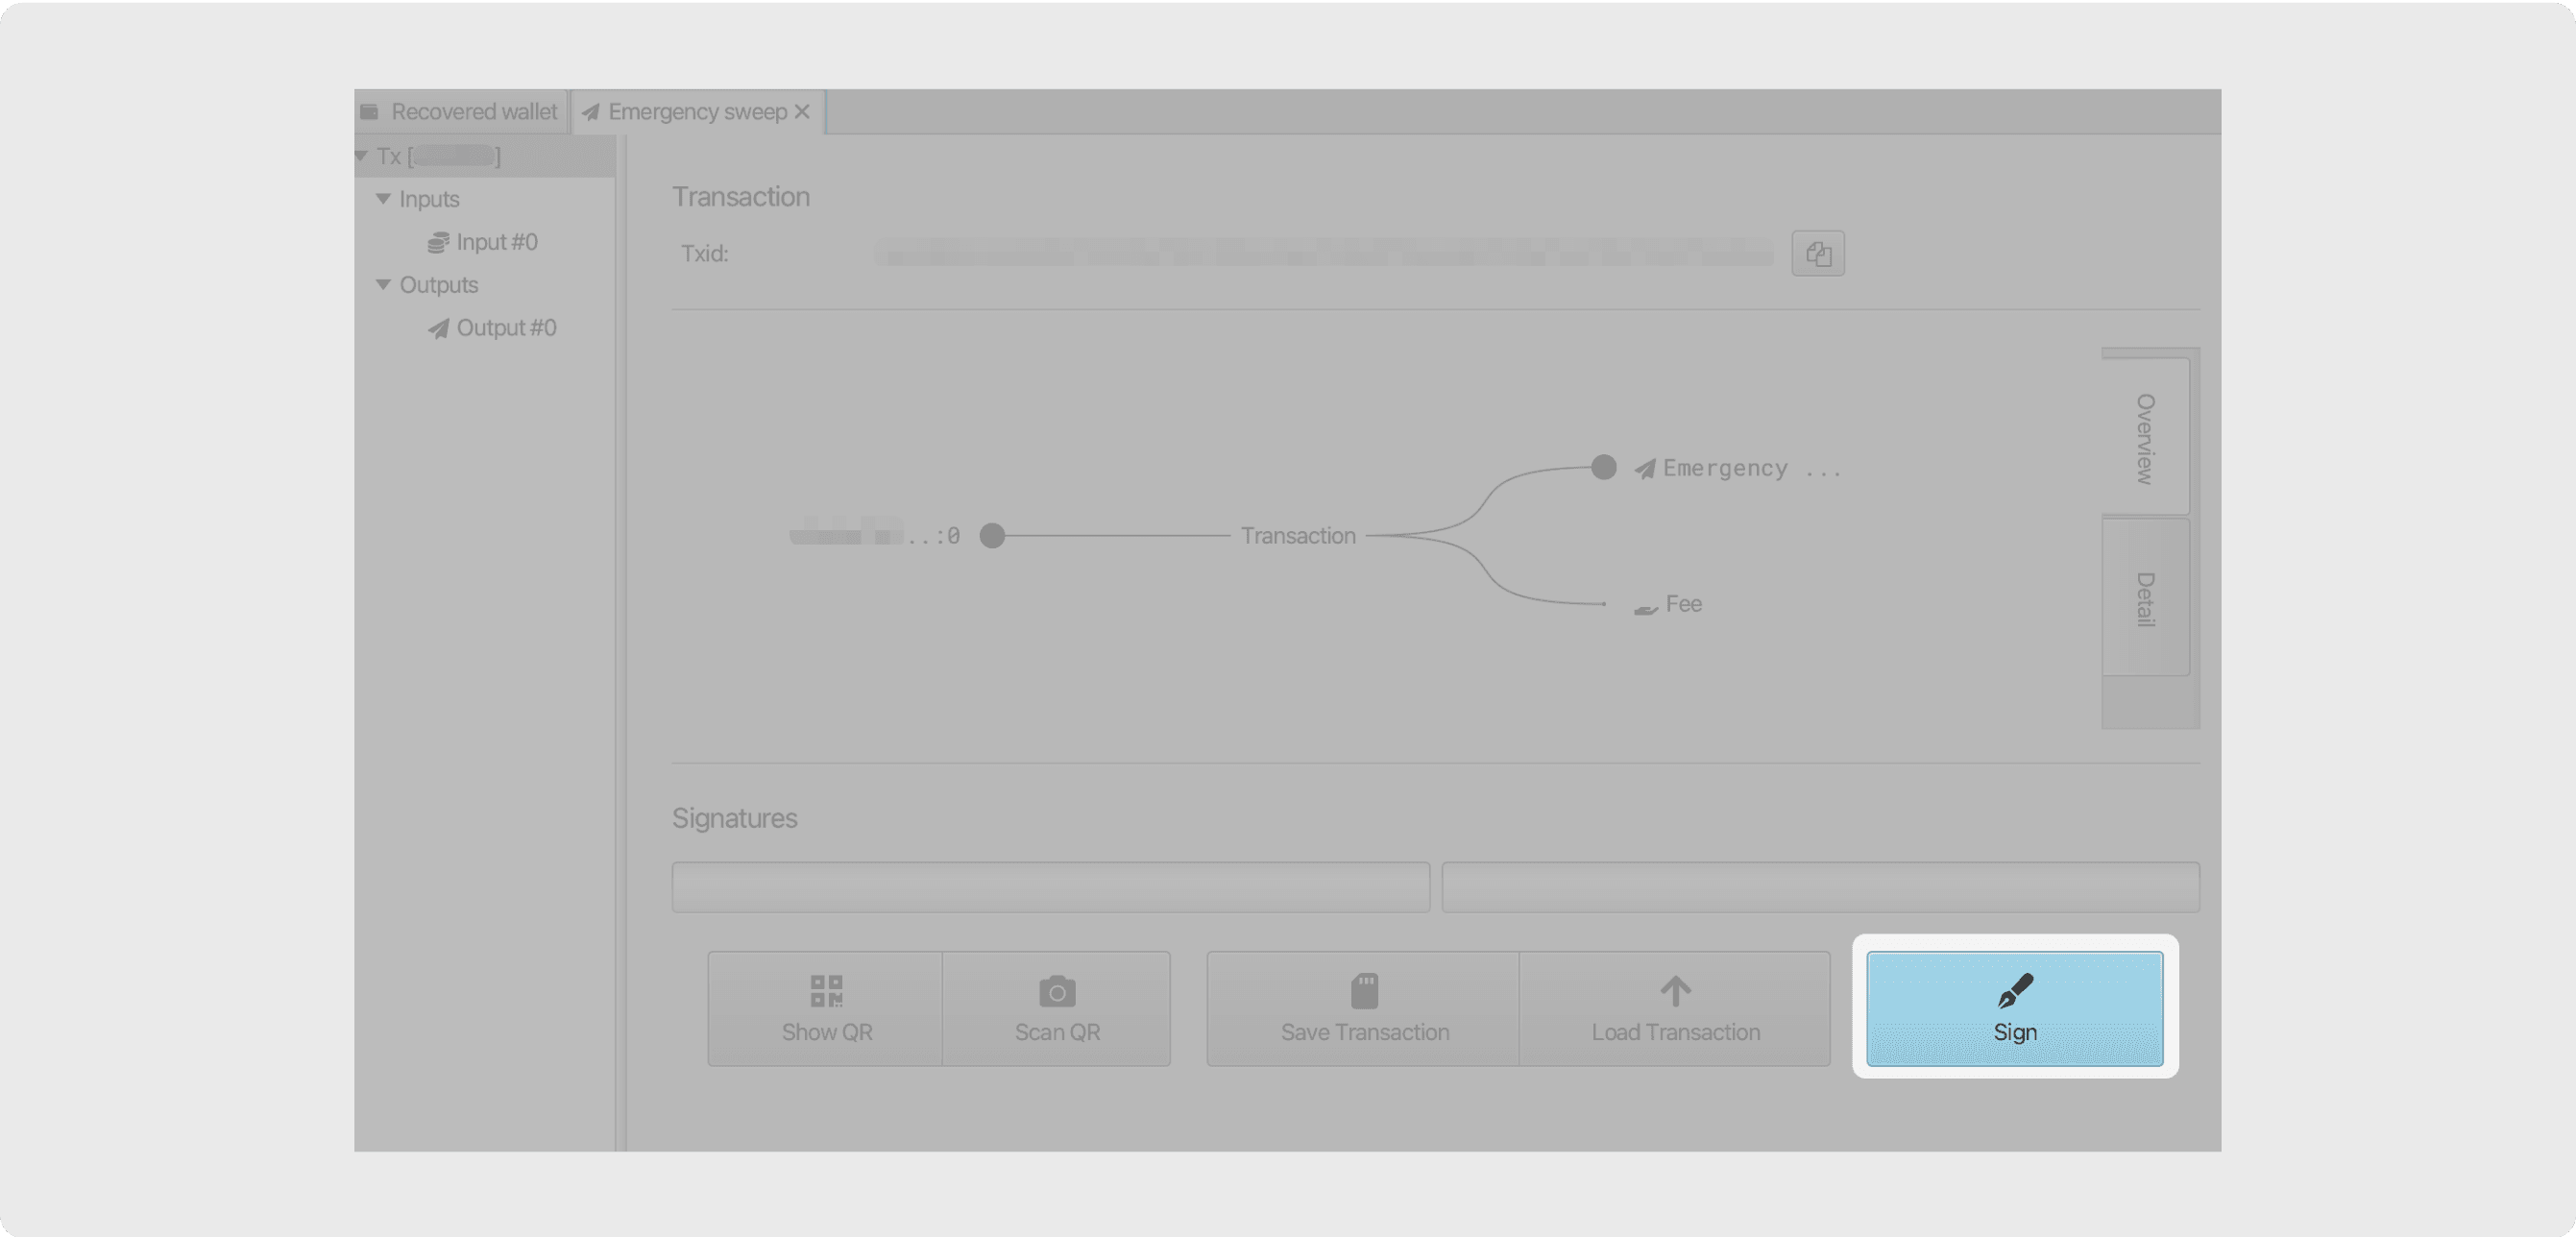
Join our newsletter
Download our app